If you're struggling to figure out ways to improve your Shopify SEO, you're not alone. Search engine optimization is confusing to begin with. Not to mention, you often have to keep up with your optimization to expand your brand's reach and consistently remain at the top of the search results.
That's why we want to cover every aspect of Shopify SEO, from notifying major search engines of your presence to fixing your URL structure. Keep reading to learn about the top areas to focus on for boosting your Shopify SEO, and be sure to bookmark and check back in with this SEO guide from time to time for regular SEO maintenance.
What are the Primary Areas to Cover to Improve Your Shopify SEO?
Website builders all have their own built-in SEO tools. The Shopify ecommerce platform is no different. However, it's important to remember that just because Shopify provides it's own SEO elements doesn't mean that search engines themselves are going to cater to what's provided to you.
Search engines change over time, but Bing, Google, and other search engines like DuckDuckGo still want similar things. They want you to optimize with the right keywords and provide valuable content, and much more.
So, the idea is to never stop working on your technical SEO just because you've filled out the SEO fields in Shopify. There's much more to it than that.
Here are the areas to cover for improving your Shopify SEO. As you read further, we'll expand upon these topics with actionable SEO tips for the ultimate search engine guide.
- Linking Your Shopify Site to Search Engines – The first step is notifying Google and Bing about your Shopify website, also opening up tools to track your success.
- Optimizing Text and Images – From researching keywords to implementing those keywords in product images and descriptions, optimization across your site is key.
- Focusing on URLs and Their Structure – Shopify has a strange URL structure, so your goal is to simplify and optimize.
- Create a Simple and Useful User Interface – Make your Shopify store responsive, think about menus, and consider how easy it is to locate products.
- Content Marketing – Everything from blogging to video creation.
Best Ways to Boost Your Shopify SEO Today
Now it's time to dissect those primary areas covered above into processes and steps that you can take to help your ecommerce store stand out compared to the competition and on the internet in general.
Submit Your Shopify Site with Webmaster Tools
Before you do anything with your online store's SEO, make sure it's indexed by the top search engines. Yes, Google and Bing, and the various other search engines, scan the internet and should locate your ecommerce website to show up in results. However, there is a faster, more effective option that also provides you resources for tracking, improving, and managing your search engine results and target keywords.
Contrary to what you may have assumed, several search engines still exist. It's not only Google. Yes, Google dominates in market share, but there are millions of people utilizing the likes of Yahoo, Bing, and even rapidly growing search engines like the privacy-oriented DuckDuckGo.
Although you can definitely go through the list of search engines and work with each one's webmaster tools, we suggest at least starting with the following:
Many other search engines don't have webmaster tools. That's a downside because you don't receive the analysis elements, but it's also nice that you don't have to do any work to get your site indexed. If you want, you can go to the Suggest a Site Tool on Yahoo. DuckDuckGo simply indexes your site automatically.
We'll only cover Google Webmaster Tools for this example, but the process is fairly similar with Bing as well.
To begin, go to the Sitemaster website and log into your Google account. If you don't have one, you'll have to make one.
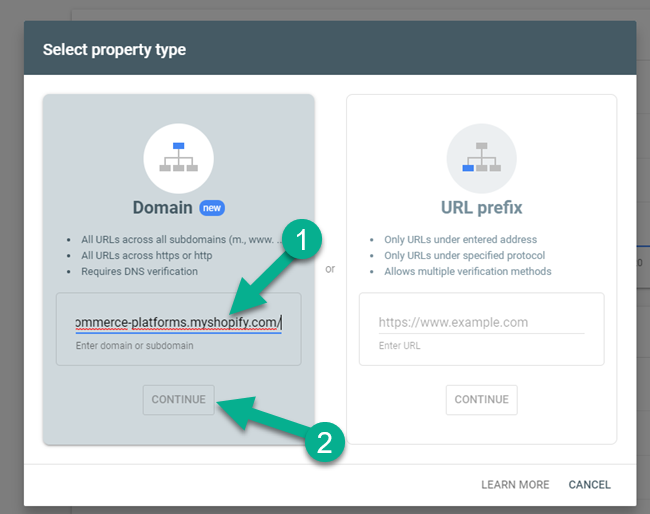
Select the area where it asks you to add a property.
If you already have properties under your account, you may have to click on the dropdown menu to see the Add Property button.
Next, paste in your store's URL. Use the field that asks for your domain, seeing how this then registers your online store's URLs across the entire domain, including subdomains.
Click on the Continue button to proceed.
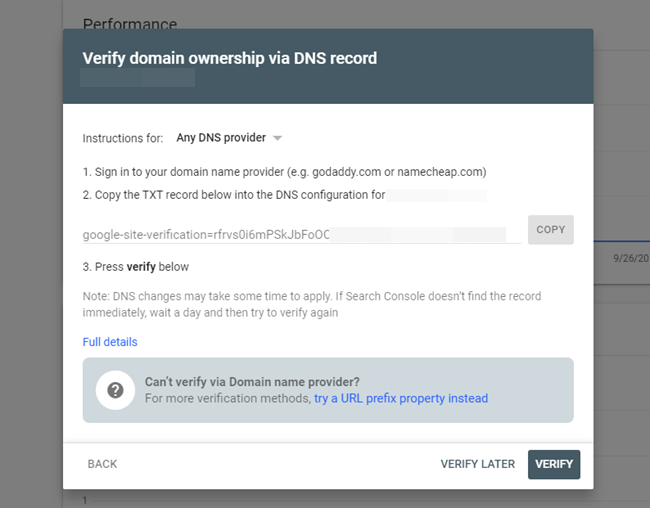
The most tedious part of this process is verifying that you own the domain.
Carefully walk through the steps provided to verify your ownership. This is generally done by contacting Shopify and making them place the TXT record into your DNS configuration. If you're savvy with this type of stuff, you also have the option to do it yourself.
Click on the Verify button when that's complete.
After that, a dashboard opens up for you to check your site performance on Google, inspect any URL problems, and submit your sitemap.xml for easier website scanning.
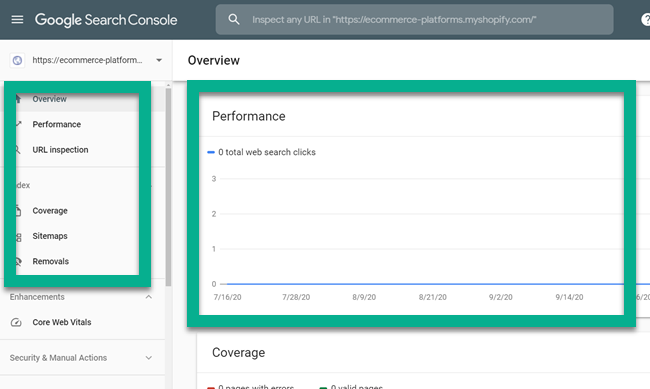
We recommend making a bookmark of Google Webmaster tools and using it to make benchmarks and evaluate your progress.
Research and Find the Right Keywords for Shopify SEO
Unfortunately, search engines don't scan your website and immediately know what you're selling.
They can't get much information from images, and your creative product descriptions may not say much besides the fact that you're selling a pair of shoes.
Ideally, you can achieve far more than that.
You can browse online to find quite a few fancy tools that promise to guide you to the correct keywords for your store. Are these tools helpful? Sure, but in general, you can think of relevant keywords for your site based on your own knowledge, industry research, and any feedback you receive from customers.
In addition, there are several free keyword research tools to verify your research.
Here's the best process for locating the right keywords for your site:
- Write down ten to twenty words that you feel reflect the nature of your site. You can also do this for individual products.
- Go to the Google Keyword Planner and search for all of those keywords.
- Save, or write down, the keyword suggestions you may not have thought about before. Also, save the keywords that are getting the most searches on Google. These are the ones that you'll be targeting.
Think outside the box for creating other keywords. Utilize the Google autocomplete section to see which longer keywords are suggested. Type in keywords and hashtags on Instagram to understand the types of search patterns people use while on social media. Create a customer profile for your store, outlining the needs and wants and pain points of your average customer, hopefully bringing up other keyword opportunities.
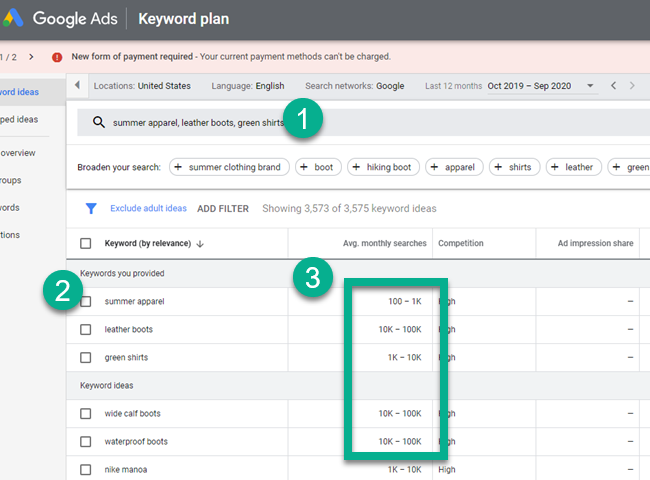
Keep going back to the Google Keyword Planner tool. This is the most valuable item in your keyword research toolbox. If a keyword doesn't have the search results you expected, opt for an alternative recommendation with more search volume or keep typing in new keywords that may relate to your store and its products.
Keep in mind that keywords with too many monthly searches and competition can mean it's extremely difficult to rank for that keyword. Either your large competitors are going to push you way down in the search rankings, or it's too vague of a term. Therefore, focus on the keywords that have monthly search volumes in the hundreds of lower thousands.
Once that's all done, you should have a nice list of potential keywords to target on your ecommerce site. Keep that handy, because you'll be using it in many of the tasks below.
Cover the Built-in Shopify SEO Essentials
Shopify has its own built-in SEO tools. They aren't much, but they're available for ensuring that the correct keywords are targeted and your store looks professional and optimized when shown as search engine results.
Therefore, it's important to fill in these fields. Most of the time, you don't have to mess with them again.
On the Shopify dashboard, under Sales Channels, click on the Online Store option. Choose Preferences.

The first module under Preferences is for specifying the general title and meta description for your store. In short, this is what shows up on Google, and other search engines, when a user stumbles upon the result online.
Here's where you get to start taking advantage of the keyword list you made before. Although it's more important to remain relevant and descriptive about your store, it's not a bad idea to slip in one or two of the more general keywords that embody your entire store. Just refrain from putting too many keywords in the description or title tag.
For instance, the homepage title may say something like Joe's Shoes – Retro Basketball Shoes from California.
Then, the description is a small paragraph that outlines the store in detail, with the occasional keyword.
While you're on this page, it's not a bad idea to configure the Social Sharing Image area, as this is technically a part of search optimization as well.

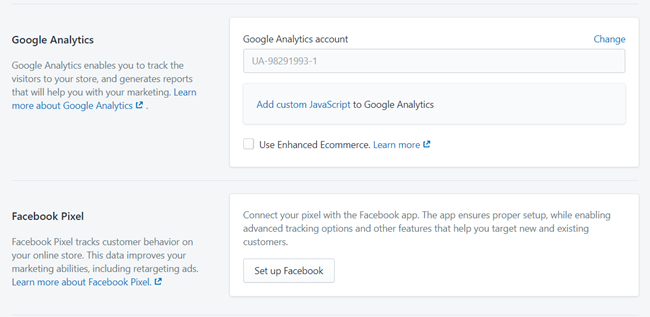
Finally, scroll to the Google Analytics section to configure that. Google Analytics is similar to Google Webmaster Tools, except with far more features for tracking where your organic traffic is coming from and how well your store is performing.
We recommend making a Google Analytics account and linking it to your Shopify site here. It's also prudent to set up the Facebook Pixel if you plan on working with Facebook.
Add and Optimize Content on Shopify Product Pages
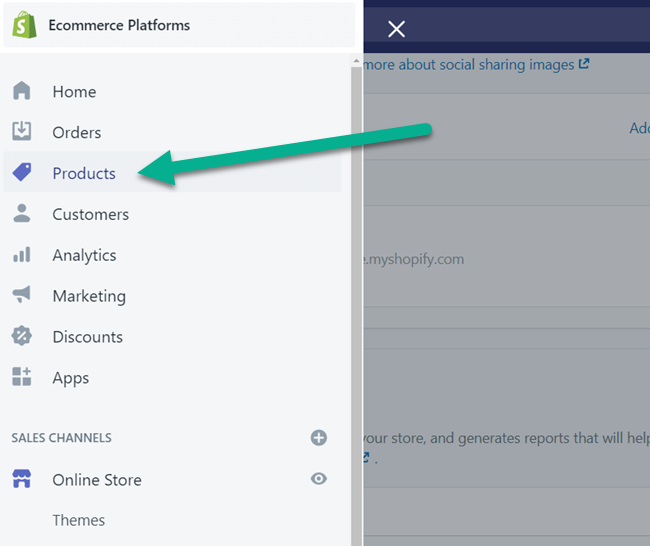
With your trusty keyword list in hand, go to the Shopify dashboard and click on the Products button.
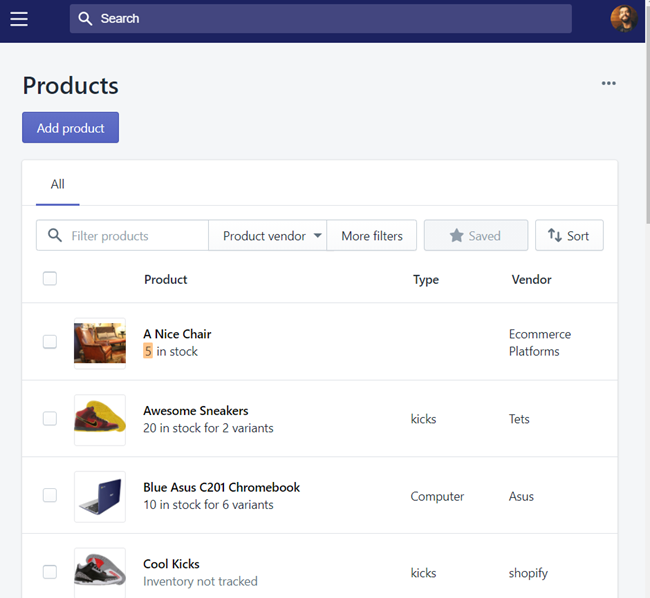
As long as you've already added products, you should see a list of your items. Filling in product page content is not only a great way to provide information to your customers, but it shows the search engines that you're doing so. It's an excellent opportunity to get creative while also listing product specifications.
As always, anything written on your online store should be optimized with target keywords. This is where your product-specific keywords come into play.
It's a tedious task, much of which you can outsource to a writer, but it's required to go through every single one of your products and fill in the content.
Click on one of your products to get started.
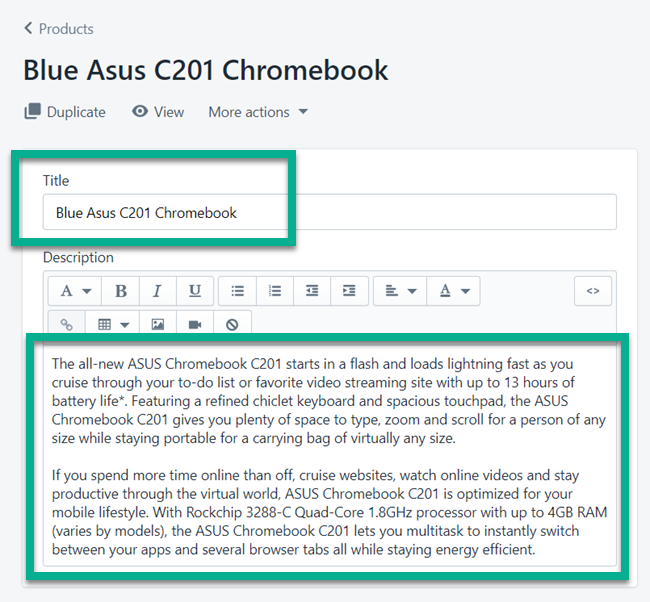
The most important part of optimizing a product page for the search engines is to fill in the Title and Description with relevant, keyword-focused information that your customers will actually use to make an informed decision and potentially buy from your store.
It's like a mix of a sales pitch and an informative friend, where you don't want to push too hard, but rather fill them in with the details required to make a purchase, from product sizing to how well it works in certain climates.
Therefore, complete the Title and Description fields using your creativity and keywords. But again, don't stuff too many keywords in there to make it look natural.
What's great about the description field is that you can really get into the storytelling of your product by incorporating additional media elements like videos and pictures.
Scroll down on the product page to reveal the Media section. A good rule to follow is to upload at least five high-resolution photos of your product. This is one of the main disadvantages of running an online store, in that the customer can't hold and examine the item before buying.
Once you have your photos uploaded, click on each image to edit the alt text.
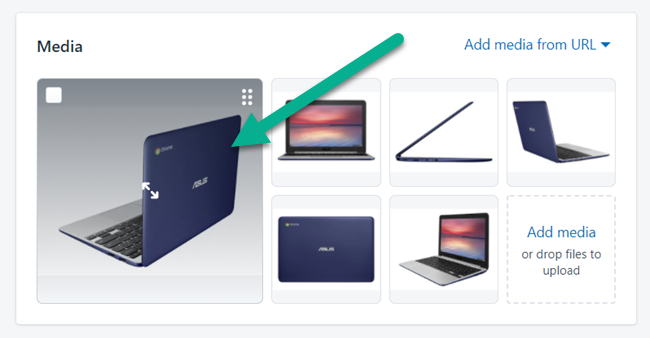
As mentioned before, search engines don't have any way to analyze a photo from the pixels that the photo contains. Therefore, a photo without an alt tag essentially gets ignored by Google.
Fortunately, you have a way to ensure the images on your store are working to improve your SEO and give the search engines more data.
It's called an alt tag, or a description that gets stored with the image to tell the search engine what's in the photo.
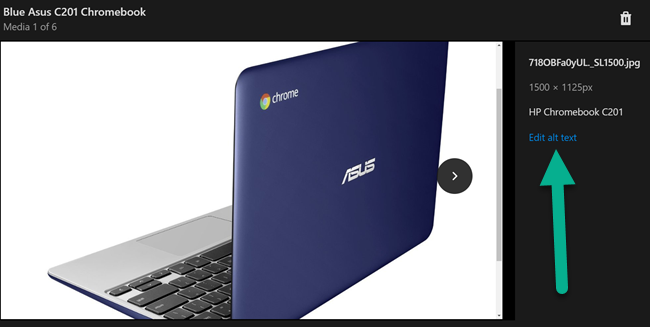
Be sure to add an alt tag to each of your images.
An Alt Tag Tip: Literally write what's in the photo. There's no harm in occasionally adding a keyword to some images, but having generic text or keywords for all images isn't what the search engines are looking for – and those tactics could actually cause harm to your Shopify SEO.

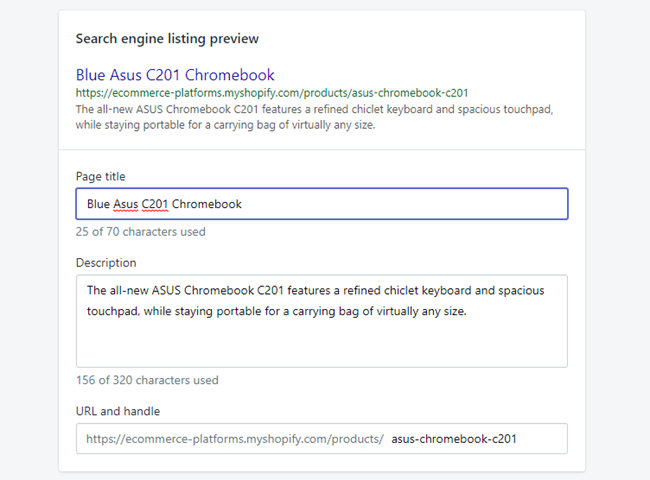
Towards the bottom of the product page, you'll find a Search Engine Listing Preview. Each page on your website has one of these, where it displays what the URL and meta description look like when presented on Google.
By default, the page title and description are pulled from what you wrote in the product title and description earlier. However, you have the option to adjust these if it doesn't quite look right, or if you'd like to add a keyword.
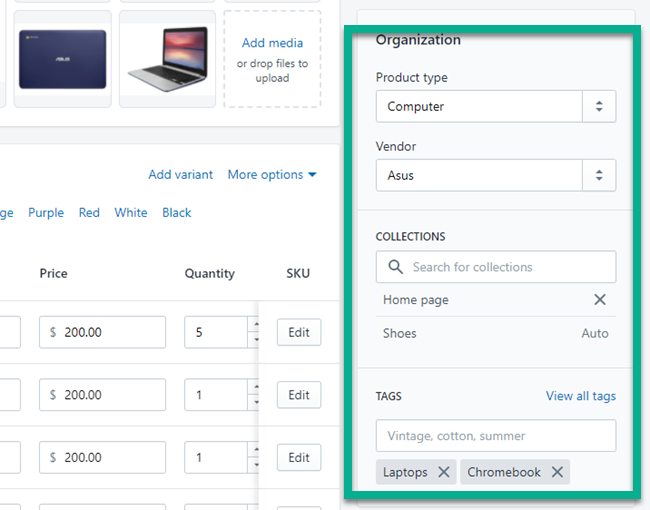
The final area to take care of on all product pages is listed under Organization. Here, you can add labels for the product type, vendor, collection, and tags.
All of these are meant to help guide customers around your online store and make it a smoother shopping experience. The search engines prefer enhanced user experiences, so this part does play into your search engine optimization.
Consider adding each product into a category for easy reference. Also label them all with appropriate tags, vendors, and product types.
Strengthen and Simplify Your Site Navigation for Better Shopify SEO
Your site navigation comes in many forms. It may seem like a great idea to turn your menu into a massive mega menu, but that's only if you have thousands of products, and if you design the menu so that it doesn't cause more confusion.
Overall, you should add the following navigational elements to your store:
- A search bar.
- A menu.
- Breadcrumb navigation.
- Footer links.
The search bar usually comes with your Shopify theme, so make sure the theme you opt for includes that. You can also find fancy search bar apps that recommend products to your customers as they type in keywords.
Your menu functions as one of the primary ways for users to locate products and search through collections. As mentioned, it's best to keep your menu simple and incorporate collections in the menu once your product list gets too large.
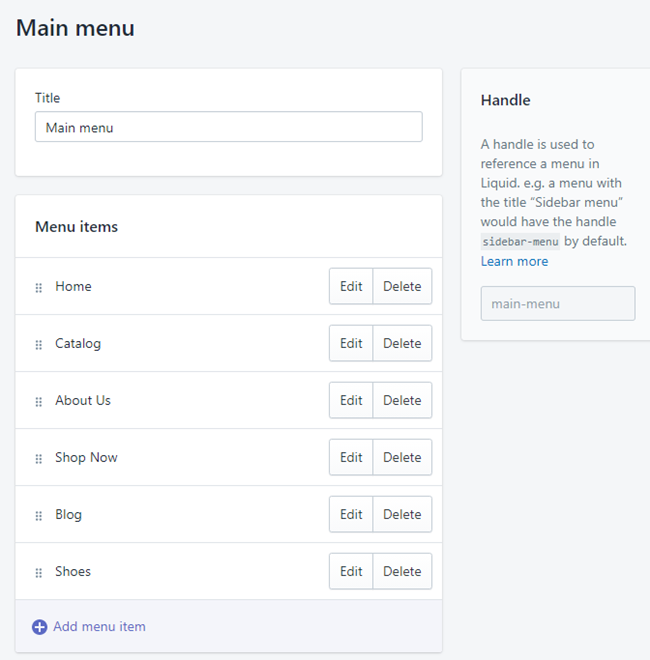
To build and adjust your menus, go to Online Store > Navigation in Shopify. This shows a list of the menus you currently have on your website. For instance, you might have a footer menu and a main menu, or others.

Name the menu and add everything you'd like to see in that menu. Shopify supports multi-level menus where you may have several collections show up when the user scrolls over the Shop Now menu item. Regardless, use this page to write the text that'll appear on the menu. After that, link each menu item to a page, collection, or even a custom link.
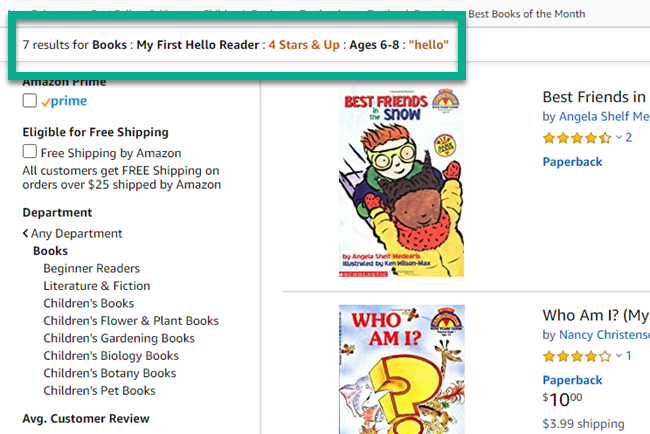
Breadcrumbs serve as site outlines, logging the path your customer takes to get to a product and showing the past pages in a list of links, often at the top of the page. If a customer ever wants to take a few steps back, the breadcrumbs remove the need to click the back button on their browser over and over again.
Amazon has always provided breadcrumbs for customers. When you search for a keyword, that keyword is logged in the breadcrumbs. Each filter or category you click on also gets added to the breadcrumbs list. Therefore, if I wanted to go back to the list when I only had it filtered for “4 Stars & Up” it would take me right there.
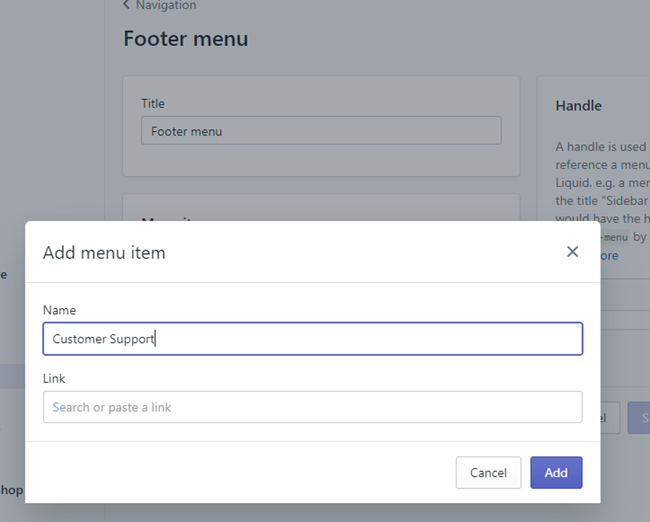
You can also make footer menus in the Navigation area of Shopify. It's no different than a main menu except that a footer menu resides at the bottom of your website and usually links to extra resources that may prove useful for your customers.
It's common to show customer support links to your forums and knowledgebase pages. Essentially, the footer menu is best for linking to the pages that you wouldn't want in your main menu but are still important to the user experience and SEO.
Clean Up Your Shopify URLs
SEO experts have somewhat of a love/hate relationship with Shopify URLs.
In one respect, Shopify does a decent job of generating clean URLs for you, based on the page and post titles you write.
However, Shopify also adds unhelpful text to your store URLs by default. Examples include the following:
- /products/ is added to all product URLs.
- /posts/ is added to all post URLs.
- /pages/ is added to all page URLs.
- Similar configurations for collection pages and category pages.
Although this renders more complicated URLs, and is not the way most content management systems generate URLs, there are far more important search engine ranking factors to be worried about. So, you still have the opportunity to rank highly with these strange Shopify URL additions.
However, there are ways for you to ensure that the URLs don't get any more complicated than they already may appear.
Essentially, your goal is to check each page, post, and product URL to ensure that they're simple, to the point, and optimized for your target keyword. It may be tempting to add all sorts of product details into your product URLs, but you're better off sticking to one or two words that reference the primary keyword for that item.
For instance, this is a bad URL: https://ift.tt/2IQPOKd.
A better alternative would be https://ift.tt/3jpVPu2.
To clean up your URLs, go to any page, post, or product page on the Shopify admin panel.
Locate the Search Engine Listing Preview. Ensure that the page title and description are filled, and look at the URL and handle to see what's going on there.
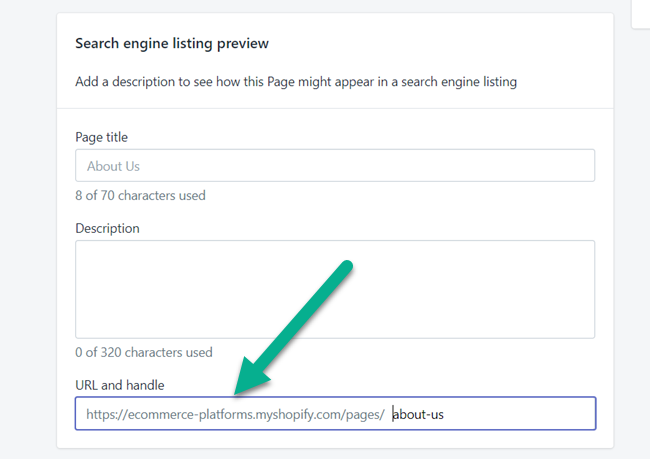
If that page hasn't been live for that long, or it hasn't been indexed by the search engines, a URL modification probably won't cause any issues.
However, older posts that have been indexed and potentially linked to by outside sources could mean that you're sending people to an old broken link.
Therefore, make sure you check the box that says Create a URL Redirect.
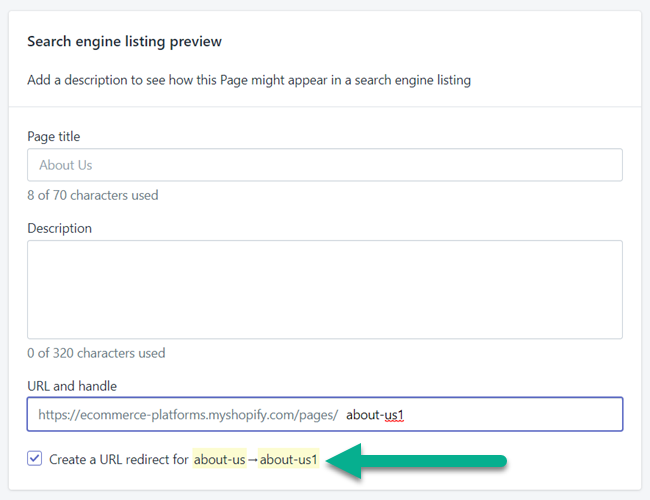
This sends all old URLs to the new one and minimizes broken pages and confusion from users.
Launch a Blog to Improve Shopify SEO
The point of blogging is not to follow the trend that you “have to start blogging.” That's a recipe for bland or forced content that's not going to connect with anyone, and it's simply a waste of time.
If you don't plan on hiring a high-quality writer, or you lack the knowledge or desire to blog yourself, you might as well skip it altogether.
Having said that, you're missing out on incredible potential from a customer outreach and SEO perspective.
Here's how blogging benefits you:
- You add more pages on your website, growing your chances of people landing on your site.
- That content could educate someone on your product or convince them that it's necessary, leading to purchases.
- Blog content can be used for other conversion purposes, like building your email list.
- Potential customers see your website as a resource they can trust to find information about an industry or product.
- Other blogs, companies, and marketers may create backlinks (for link building) to your blog posts if it provides high-quality, relevant information.
The blogging management section on Shopify isn't remotely close to the quality you get with an option like WordPress, but it definitely does the trick for most online stores.
To start blogging in Shopify, go to the Sales Channel tab and click on Online Store.
Select the Blog Posts button.
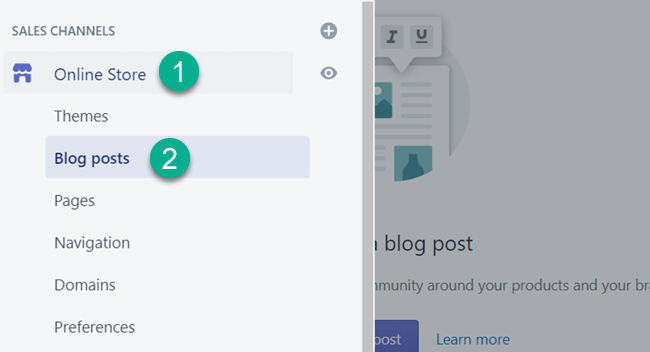
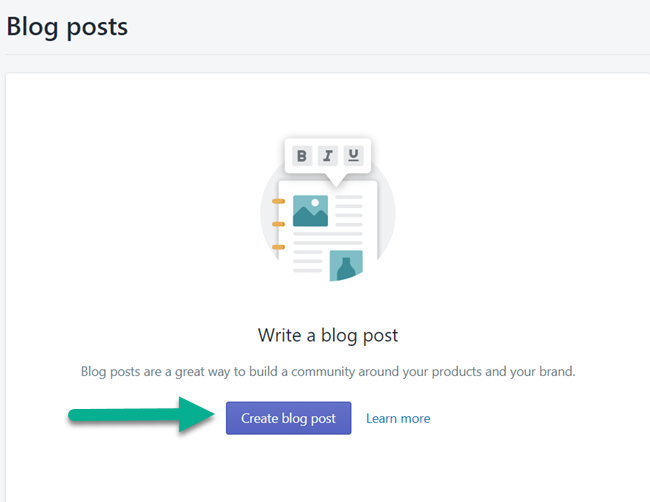
Once you have several blog posts you'll see a list of the published content. For now, all you have to do is click the Create Blog Post button.
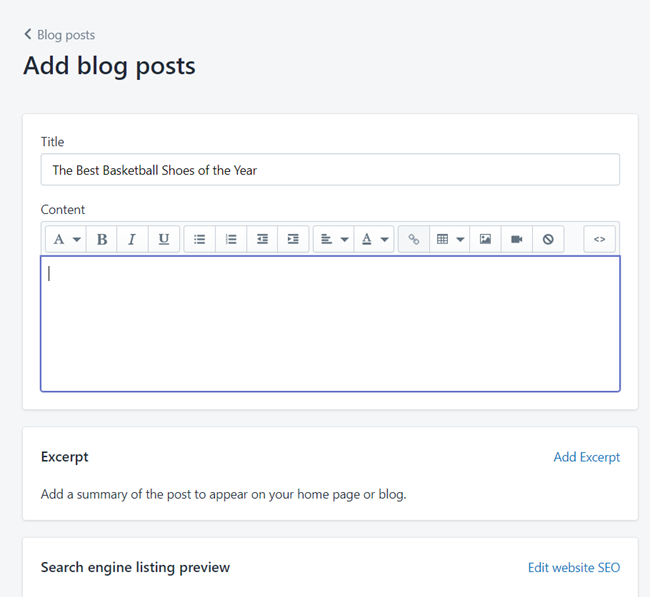
After that, your creativity is the only limit! Make a catchy title, write your article, and fill in the post with high-quality images and videos.
The blog posts also have options for uploading featured images, optimizing for search engines, and more.
After you've been blogging for a while, you can start distributing that content on places like Facebook and Instagram, or wherever your customers hang out. Many stores also find that forums work well for sharing useful content.
We also recommend reaching out to other bloggers and marketers who may find your content relevant to their own work. This way, you can offer to guest post on their blog or maybe they'll link to your page without anything in return.
Do yourself a favor and refrain from getting frustrated with blogging right at the start. Writing is tedious, and it's not for everyone. However, getting a quality writer who knows your business can start to show returns in the future, especially when it comes to traffic and those who are looking for information.
Add Essential Shopify SEO Apps
Apps serve Shopify users by helping expand on functionality and implement tools that aren't built into the system.
You'll learn further down in the article that you don't want to go overboard with apps, but there are a few that assist in analyzing ecommerce SEO or improving it on a regular basis.
Although this is far from a completed list, here are some suggestions for essential SEO apps:
- An image optimizer like AVADA – Automatically shrink and resize images uploaded to your store, making for a faster loading experience.
- An SEO-friendly booster app like SEO Optimizer – Automate SEO elements like alt-text creation and meta information.
- A rich snippets creator like the SEO, JSON-LD, Schema app – Rich snippets improve SEO by adding visual elements to your search engine results (often ratings and reviews). These apps usually incorporate other features, like for the Google Search Console and sitemap submissions.
Overall, your SEO apps should be kept to a minimum. The good news is that you can typically find free versions that don't eventually make your monthly payments too expensive.
Clean Up the Apps
If you've ever used WordPress, or any other content management and website builder for that matter, you may have heard that having too many plugins can slow down your site and cause security vulnerabilities.
It's not talked about as much with Shopify, but the same is true.
Essentially, each app you have on Shopify creates a new site file, many of which are rather large.
Site speed plays a huge role in your search engine optimization, seeing as how Google doesn't like it when websites take too long to load. Neither do your customers.
Therefore, we recommend going through your current list of Shopify apps and only keeping the ones that are absolutely essential. If you're having a tough time deciding, think about the apps that are actively bringing in money for your company. Keep those.
Also, cut the apps where you could get the same functionality from an outside tool, or get it directly coded into your website from a developer.
For instance, many social media apps for Shopify are non-essential, since there are third-party programs that do the same thing without weighing down your site.
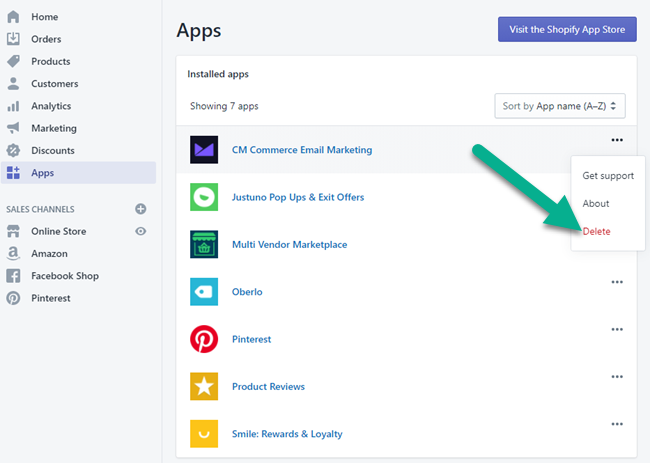
Go through your list of apps and make sure to get rid of the ones that are only going to slow down your site, since it's difficult to tell which of them may cause conflicts with your site coding or may be simply too big for your site to handle.
Test for Broken Links and a Fully Responsive Design
The final step to establishing an iron-clad Shopify SEO strategy is to test the site.
It's easy to assume your user interface runs smoothly and the theme works exactly the way you want it to. However, building a website is a complex set of logistical links, so you're bound to occasionally encounter conflicts between apps, design flaws, and broken links.
We suggest navigating through your store just like you would if you were a customer. Send the link to friends and colleagues to do the same.
Write down everything, like areas where there's duplicate content or when you click on a link and it leads to an old, broken page.
Keep Working At It to Improve Your Shopify SEO
It's a good practice for store owners to run through an SEO list like this one on a monthly or quarterly basis. Ask yourself questions as to how you can improve your SEO every now and then and go through the manual testing to identify SEO issues with your site structure.
If you have any questions about Shopify SEO, let us know in the comments!
Featured image credits: macrovector/DepositPhotos
The post Shopify SEO Guide (Oct 2020): Turn Your Store Into Search Engine Gold appeared first on Ecommerce Platforms.
 from Ecommerce Platforms https://ift.tt/35hEuOW
 via IFTTT


No comments:
Post a Comment