
Creating your brand is more than just your store’s name and logo. Good brands have a visual and emotional impact that attracts an audience and keeps them coming back. Your brand identity will affect every part of your business, from the products you sell to your site’s design. Your brand identity should showcase who you are as a company and convince your audience to buy from you and not your competitors. You don’t have to spend millions to build a brand—you just need a branding plan.
We’ve created a fill-in-the-blank branding plan template designed specifically for online stores, and this guide will give you an in-depth, step-by-step walkthrough for building a brand that converts.
Table of Contents
Part 1. Creating a Branding Plan
Part 2. Determining your Target Audience
Part 3. Creating User Personas
Part 4. Establishing a Tone of Voice and Brand Persona
Part 5. Building your Brand’s Visual Design
Part 6: Creating your Brand’s Mission and Values
Part 7: Identify your Unique Selling Points and Craft your Value Proposition
Part 8. Reinforcing your Brand on Social Media
Part 9. Brand and Reputation Management
Part 10. How to Measure the Results of your Branding Efforts
Part 1: Creating a Branding Plan
Whether you’ve been dreaming of branding a business for years, or thought branding was just a way to mark cattle up until now, these steps can help take you from concept to cohesive execution in a flash.
What is branding? According to the American Marketing Association, “A brand is a name, term, design, symbol, or any other feature that identifies one seller’s good or service as distinct from those of other sellers.” It forms your identity in the marketplace through three things: your purpose, your position, and your personality. The goal is to assess these three factors of your business and build around them so you’ll have a well-defined voice that resonates with customers. It tells a story that draws people in, makes your brand unique, and has your voice built around it.
Your branding strategy plan will be comprised of the following elements:
- Results of your competitor research
- Audience research and user personas
- Your brand’s tone of voice
- Your brand image
- Your brand story and values
- Your value proposition and unique selling position.
We know you’re ready to jump right in, which is why we’ve done as much of the work for you as possible by creating a brand strategy template created specifically for online stores. Just fill in the blanks, and at the end you’ll have your very own brand strategy to refer to whenever you need it.
Perform your Competitor Branding Research
The first step in building your brand that converts is to do some research. A good place to start is researching your competitors. If you're starting a business selling a specific product, try googling other businesses that sell the same product to give you an idea of what your competition looks like. You can also take a look at brands on Facebook to get an idea of how they are talking to their customers and representing their company on social media. One effective and powerful branding approach is to try to stand out from your competitors as much as possible.
Try to research at least three competitors using the Brand Attribute Checklist below and identify what similar attributes they have and what makes them unique. Take some notes: do they all have similar website color schemes such as using blue backgrounds? Are their fonts all traditional? During the research phase, note what you feel you should incorporate into your brand identity. What do you like that your competitors have, and what do you dislike? This will help you create a unique brand identity as you move forward.
Brand Attribute Checklist
To help list the attributes associated with your competitor stores and plan your own brand attributes, use the brand attribute checklist in our brand plan template. We also break down each of the brand attributes in more detail below:
Brand Voice
- Brand Name: Is the brand name descriptive (makes it clear what products or services are being offered), or is it more inventive? Is it unique and easy to remember? Does it fit the overall feel and theme of the brand and its products?
- Brand Slogan or Tagline: Does the brand use a slogan or tagline (like Nike’s famous “Just Do It”)? What message are they trying to convey using their tagline or slogan?
- Tone of Voice: Look at each brand’s website and social media accounts and see what sort of language they’re using. Are they trying to sound trustworthy and authoritative? Playful and fun? Down-to-earth?
- Products: What sort of products does each brand offer, and how do they describe them? Are they emphasizing their products’ value, fashionableness, or quality? If your competitor offers a variety of products, try to restrict your analysis to just those products that compete against what you’ll offer.
- Social Media Presence: Is the brand active on social media? If so, what sort of content are they sharing, and how do they interact with their customers? For some brands, this may be very similar to their core brand voice. For others, it might be quite different, like the famously sassy Twitter account of Wendy’s Hamburgers.
Brand Image
- Imagery: What sorts of images does each brand use on their site, and what emotions are they trying to convey? Outdoor products may want to convey a sense of adventure, while an interior design site may want to convey feelings of warmth and coziness.
- Color schemes: What colors are prevalent on competitors’ sites? Color has an important (and underappreciated) role in a site’s look and feel.
- Logo: What sort of logo are they using? Does it intuitively tie back to their brand or products, such as a fishing company using a fishhook in their logo?
- Mascot or figurehead: Do your competitors use a mascot, spokesman, or other figurehead?
- Site Layout: Take a look at your competitors’ product categories, what they feature on their homepage, and their overall site design. Is there one product in particular they’re trying to drive traffic to?
Brand Story
- Brand History: Check your competitors’ About Us pages and read their brand story. This will tell you why they’re doing what they’re doing. Do they have a hundred years of experience in this industry? Are they an up-and-coming young startup with bold ideas or new technologies? Are they a husband-and-wife team pursuing their passions?
- Mission Statement: Your competitors’ mission statements are a great place to get a summarized view into their overall goals and values.
- Brand Values: Check out your competitors’ value statements—in essence, what sorts of things they believe in. These will sometimes be written in their About Us page or other copy, but sometimes you’ll need to figure them out for yourself. Does your competitor support a philanthropic cause? Are they dedicated to providing the most durable products in the industry?
- Brand Consistency: Is the brand reinforced everywhere that customers can interact with the brand? Are they using similar language, imagery, logos, color schemes, etc.? Being inconsistent in your branding can confuse customers, and will make it more difficult for them to form a coherent picture of your brand.
- Authenticity: Nobody likes a faker. Does the brand stand by the values it claims to have? Do they seem to genuinely care about the products they sell, or are they just looking to make a quick buck?
For each of your competitors, list out the brand elements above. Make a note of any similarities across your competitors—are all of their sites predominantly blue? Are they all trying to sound professional? After you’ve listed these elements out for your competitors, write one for your own store (even if it doesn’t exist yet). Identifying where you want to go with the flow and where you want to stand out will help you decide on your overall brand position.
Part 2: Determining your Target Audience
With the vast selection that consumers have online these days, companies need to do more to gain customers. Think about it from your own perspective—are you more likely to buy from a store that tries to be everything to everyone, or a store dedicated to your personal needs and interests? Consumers reward the effort that companies put into understanding and serving them as individuals. To garner attention and favor, you need to put some extra effort into your marketing. A big part of that is determining your target audience and figuring out how to cater to their needs and desires.
Determine your Target Audience
Once you know who you are focusing on, your company’s marketing decisions will come much easier. What one consumer loves, another may hate, so you want to make sure your design, wording, imagery and overall brand is in line with the needs and tastes of your precise target audience.
Matching your message to your target audience has a ton of real-world benefits, and will often make or break an online store. A good audience/message match will increase your number of sales, impact brand loyalty and your number of repeat sales, and improve the number and quality of reviews that your customers leave for your products, among other things. If you’re planning to use paid advertising on search engines or social media, knowing who to advertise to is critical to advertising profitably—otherwise, you’ll spend a ton of money showing ads to people who couldn’t care less about them. If you’re selling a wide variety of products, you may need to create several target audiences.
Target Audience vs. Target Market: What’s the difference?
We’ve put together a target audience template designed specifically for online stores to help you narrow your target audience down to the people who are most likely to actually make a purchase. You’ll be using your target audience research again later when you’re creating your customer personas, so make sure to make your own copy of the template and fill it out. We also dig into the different info you’ll need when creating your own target audience below.
What are you really selling?
Try to think about the motivations or needs of the people buying your products. For example, if you're selling alarm systems, you're not really selling equipment, but the feeling of security and protection. If your online store sells nail polish, you're not selling just the polish—you're selling a sense of fashion and style. If your product solves a particular pain point or customer need, you’ll want to take that into account in your audience targeting. You’ll also need this info later when creating your value propositions.
Who will the product serve, connect with, and appeal to?
It's important to think about who will ultimately use the product, but often it's even more crucial to make a connection with the person who will be buying it. For example, teachers get a lot of apple-related gifts, but they don't purchase them for themselves. If you're selling teacher gifts, you should appeal to the kids and parents looking for an item to express their thanks at the end of the school year.
When thinking about your target audience, you’ll need to list out two different types of information: demographic information, which includes the physical and personal characteristics of your audience, and psychographic information, which includes the personality, values, and interests of your target audience. Fill this information out in your target audience template—if you need clarification on any of these traits, we’ve broken them all down below:
Demographic traits:
- Age: A rough age range of the people that might be interested in your product. The standard age ranges 12-17, 18-24, 25-34, 35-44, 45-54, 55-64, and 65+. Your own age ranges may be much more specific or much broader than these—just use whatever age ranges make the most sense for your particular product. If your product appeals to people of all ages, it might be more useful for you to think in terms of life stages, such as students, new moms, or retirees. While it may not seem terribly important at first, determining the age of your target audience is critical. Not only will it help you decide on the overall tone and content of your messaging, but it will help you decide which platforms you want to use to connect with your audience—if you’re selling products to people aged 65+, you probably don’t want to try to connect with them over Snapchat.
- Location: If your product is targeted at people living in a certain area (such as merchandise with the Texas flag on it), you’ll want to take this into account in your marketing materials. Similarly, if your product is only useful to people who live in certain types of locations (for example, a fold-up bicycle designed to fit on the subway), make sure to take that into account as well. In sum, if there are any geographical factors that affect whether or not people will want your product, list them here. The last thing you want to do is try to sell umbrellas to people living in the desert.
- Gender: If your product is targeted at members of a specific gender, list it here. If this isn’t relevant for your products, skip it.
- Income Level: Is your product a luxury, a convenience, or a necessity? If you’re selling luxury or boutique products, you’ll want to target customers who can afford your products. If you’re selling value-focused products, you’ll likely want to target budget-conscious customers. The “luxury or value” question is more important than the overall price of the item you’re selling. For example, customers routinely spend large amounts on automobiles (always a big-ticket item), but someone willing to shell out extra for a new Mercedes is definitely more luxury-focused that someone who just wants a Honda to get them to and from work each day.
- Education Level: Your customers’ education level doesn’t always equate to them having a Master’s degree—instead, it often refers to how familiar or educated they are about your products as a whole. If you’re selling high-end Scuba gear, you know that your target audience has their Scuba certification and knows quite a bit about technical things like dive planning. If you’re selling a beginner-level snorkeling kit, it’s better to assume that your audience knows very little about diving or water safety. If your content is too technical for your audience, they’ll be confused. If it’s over-explanatory, your audience may find it useless, or worse, condescending.
- Marital Status: If your product is only relevant to married or single people, list that here. It’s no use selling engagement rings to the already married (hopefully!)
- Occupation: Some products are focused around occupations, such as fashionable scrubs for nurses or comfortable non-slip shoes for restaurant workers. If your product is particularly useful or appealing to those with a particular job or type of job, include that info on your template.
- Ethnic/linguistic Background: If your product is marketed for particular ethnic or linguistic groups (for example, bilingual Hindi-English books for children), take this into account when deciding on your target audience.
Psychographic traits:
- Personality Traits: What personality traits do your customers have? Check the personality attributes tab on the Branding Plan Template for hundreds of possible personality traits. The more you can get into the head of your target audience, the easier it will be to speak to them in ways they’ll relate to.
- Attitudes: What sort of attitudes do your potential customers have, particularly in relation to your products? Is your product something that excites and engages them, or is it just a routine daily purchase? Are they skeptical about your brand-new technology? Do they hold positive or negative attitudes about this type of product as a whole based on past experiences?
- Values: What sorts of things does your target audience value? Are they family-oriented? Concerned about the environment or social justice issues?
- Hobbies/Interests: Does your product support a particular hobby or interest?
- Lifestyle: What sort of lifestyle does your customer value? Are they an always-on-the-go traveling executive who prioritizes efficiency above everything else? Are they fitness-focused? Are they health-conscious, concerned about what additives and preservatives are in everything they eat? Segmenting your audience by lifestyle will help give you a closer look into the way your customers make their daily decisions, and can help you make or break the sale.
- Purchase Behavior: What sorts of behaviors do your target audience engage in when deciding to make a purchase? Most particularly, what are the key obstacles you’ll need to overcome when persuading a buyer to make a purchase? Is your customer the type to obsessively research your product and its alternatives before buying, or are you counting on a quick impulse buy? Does your customer need proof that your product works before buying? Do they only buy if they know they can easily return your product?
Once you’ve gotten a good idea of your target audience, your marketing will become much easier (and much more profitable). Not only will you avoid wasting time and money trying to sell products to those who aren’t interested, you’ll also be able to find the people who will genuinely engage with and care about your products, which will help you build lifelong customer value. If you get your marketing right the first time, you can get a lifelong customer from a single investment.
Using Google Analytics to Create Accurate Target Audiences and User Personas
Google Analytics can provide a wealth of information about your customers. For more information about setting up Google Analytics, check out Part 10 of this guide: Measuring the Results of Your Branding Efforts.
Demographic data in Google Analytics
The good news is that if you have Google Analytics set up for your site, you already have a lot of demographic data to help you create your target audiences and user personas. Google Analytics collects much of this data for you without needing any custom tracking, although additional tracking will definitely give you more valuable information, as we’re about to see. To access this info, go to your Google Analytics account and find the Audiences tab in the left navigational menu:
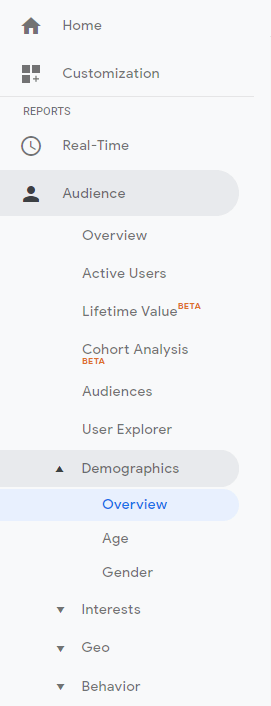
The Demographics Overview tab will give you a high-level breakdown of the age ranges and genders of your site’s visitors. While this info can be useful, it only shows you who is visiting your site, not who is actually making purchases. One of our clients was kind enough to give us access to their Google Analytics account for the sake of this guide:
Even without custom tracking, Google Analytics will give you basic demographic data.
How to use gender data when creating your user profiles
In this example, we see that our overall audience is almost perfectly balanced between male and female, so when we create our user personas we can choose either gender or create a profile for each. If your site’s traffic is skewed towards a particular gender, you’ll probably want to use the more common gender to create your target audiences and user profiles.
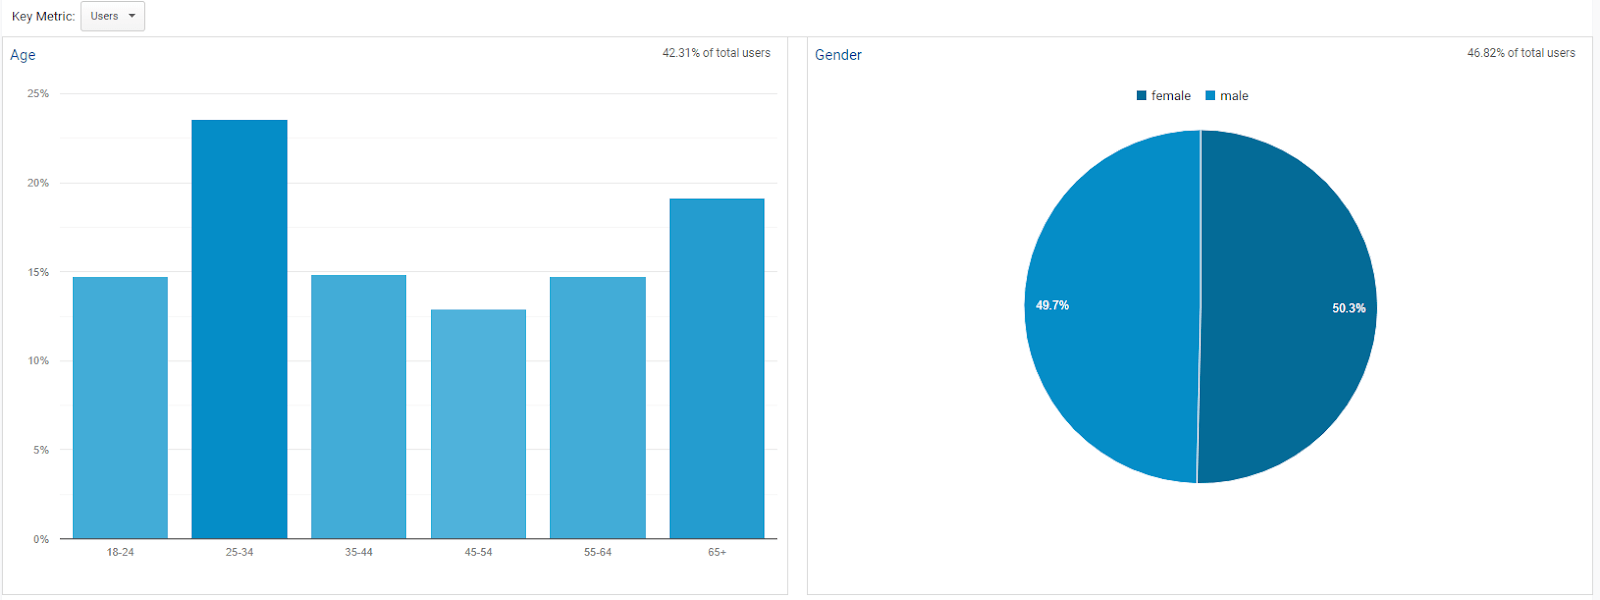
To dig more deeply into gender data, click the Gender tab beneath Demographics. This is most useful if you’ve also set up ecommerce goal tracking within your Google Analytics account, and can give you very valuable insights into who is making purchases on your site:

To calculate the average order value, divide revenue by the number of purchases.
After digging more deeply into conversion data, we see that while the overall number of visitors and purchases are the same, the average order value (AoV) for men is much larger.
Women have made six purchases over a one-week period, but the total revenue for these purchases was only $224, for an average order value of $37. Men, on the other hand, made eight purchases over that same period, but the total revenue for those purchases was a whopping $1504, for a much larger average order value of $188. This means that men are making larger purchases than women, so we’ll want to target men in our user profiles. If we hadn’t dug deeper into our gender data, we would only have seen that men and women are visiting the site at approximately the same rate—not that men are spending much more when making a purchase.
By default, your Google Analytics account will be restricted to only looking at the prior week of data. You can change the date range selection for your data in the top right of your screen. This can be very useful for identifying long-term trends.
How to use age data when creating your user personas
We also see that our most common age range is 25-34. If you want to dig deeper into Age data, select the Age tab beneath demographics for a much more in-depth breakdown.
Digging deeper into the Age data shows some surprising (and profitable) info.
Similar to the Gender data, digging deeper into our Age data shows something surprising. While the majority of our users are age 25-34, the age group of people most likely to make a large purchase are ages 55-64. This means that targeting younger people might be effective to drive visits to our site, but if we target the 55-64 age group, we’ll be much more likely to actually make high-value sales—which is what we’re really after. After learning this, we know that we’ll want to target our user profiles towards people aged 55-64, not ages 25-34.
Interests & Affinities Data in Google Analytics
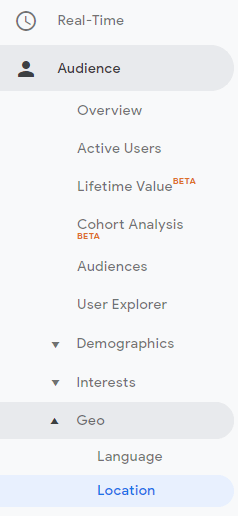
When creating your user profiles, half of the battle is learning what sorts of things unrelated to your products that interest your users. This will tell you what sorts of people engage with your site and products and how to market to them. To see interest and affinity data in Google Analytics, navigate to Audience, then Interests in the left-hand nav:

After navigating to that menu, you should see data broken down into three areas: Affinity Category (reach), In-Market Segment, and Other Category:
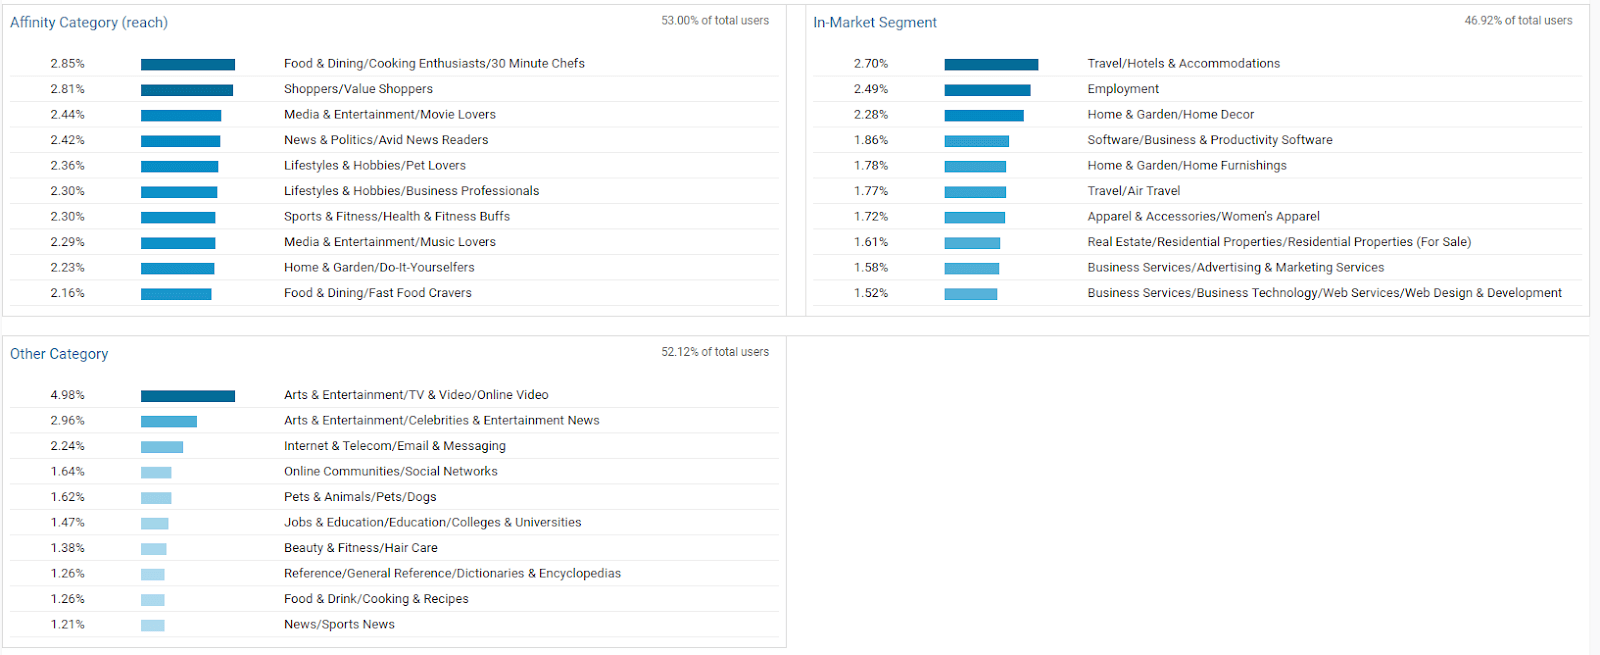
Using Interest Categories is a great way to find new prospective customers.
We’ll break each of these down and tell you what they mean, as well as how to use this data when creating your user persona.
Using Affinity Category (reach) data to create user personas
Affinity categories in Google Analytics tell you what other sorts of things your customers are interested in. This information is most useful when trying to make people aware of your products or services—these categories may not have much to do with the products you’re selling, but the people who are interested in your products are also interested in the topics listed here. This info will help you fill out the interests and hobbies portions of your user personas, which will help you find new ways to get the word out about your products. These are the same affinity categories used by Google ads, so if you’re planning on doing any paid advertising, this information will be invaluable.

Find the people who are the most likely to engage with your brand.
Digging deeper into the data tells us what sorts of hobbies and interests are most likely to correlate with sales. Here, we see that the largest cross-interest is pet lovers, so we may want to include pet ownership within our user persona, as well as think about how to market our products to pet lovers. However, getting this level of data requires you to set up custom conversion tracking in Google Analytics.
Using In-Market Segments data to create user personas
In-Market Segments data tells you what customers who are lower in the funnel (more ready to make a purchase) are interested in. These users differ from Affinity Category users in that they’re more likely to make a purchase soon within the category they’re listed in—for example, someone under the Hotels and Accommodations category is likely to book a hotel soon.
While it might seem like this data isn’t terribly useful to you (who probably aren’t running a hotel), there is still a ton of very valuable information you can gain from this section. Look at the categories listed within this section and think about the opportunities for cross-sales—for instance, if someone is about to book a hotel room, they’re likely planning a trip somewhere and might need a travel charger, new suitcase, or a myriad of other products.
To dig more deeply into this data, click the In-Market Segments tab beneath Interests:
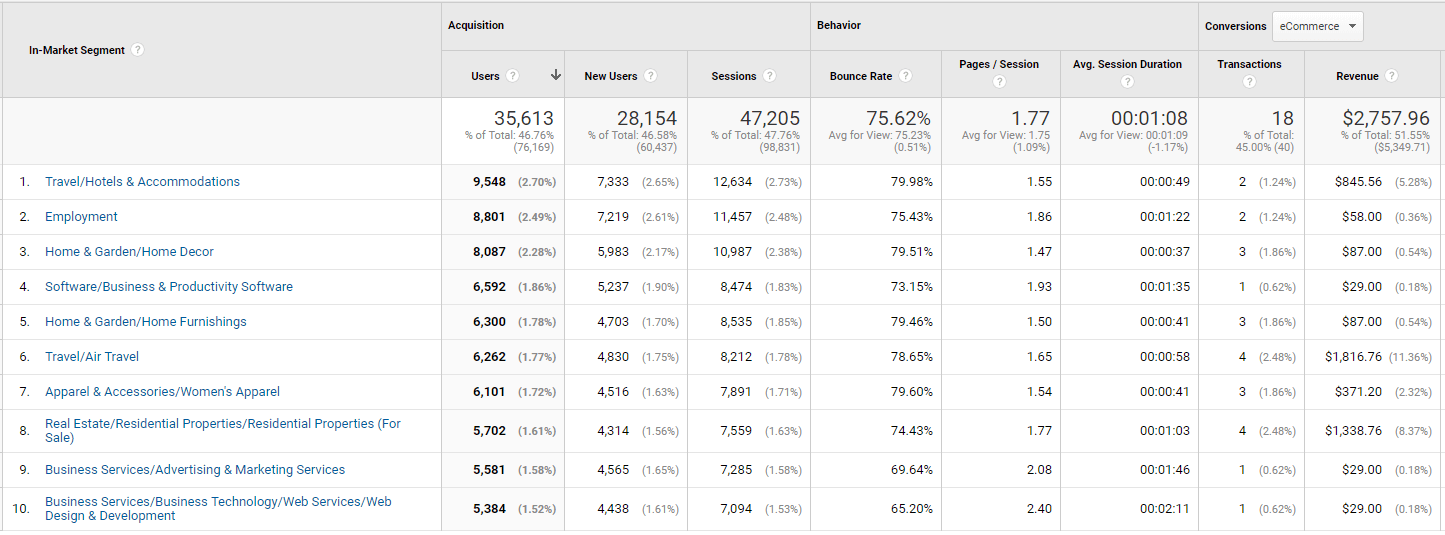
Find those profitable cross-selling opportunities with in-market segments.
This data will tell you the likelihood of a user purchasing your product at roughly the same time that they purchase a product in their respective categories. Here, we see that customers likely to book air travel soon are the most likely to purchase one of our products. When creating our user profiles, we might want to add ‘frequent traveller’ to our list of customer traits, and consider what value our products can give to travelers.
Of the three types of interest data available in Google Analytics, in-market segments data is often the most useful, since the users in these profiles are lower in the funnel and more ready to make a purchase. These users are prime for cross-selling opportunities, so if you see a category that’s closely related to your own products, it might be a good time to start a targeted ad campaign towards that group.
Using Other Categories data to create target audiences and user personas
The Other Categories data is the most granular, and splits users up into distinct interest groups. This can be great for really narrowing down your customer targeting, especially if you see a category that’s closely related to what you’re selling. For example, the Pet Lovers category we saw within the affinity categories earlier is broken down even further to dog owners. Since someone who owns a pet fish will buy completely different products than someone who owns a dog, this info can give you the details you need to make much more targeted marketing decisions.

Get granular in order to fine-tune your marketing efforts.
In this example, we see that people who watch online videos have the highest number of transactions, but that their average order value isn’t very high. This tells us that running a video ad campaign for low-value products might be profitable. Conversely, we see that although only one purchase was made by someone interested in colleges and universities, it had a very high order value, so perhaps college students are more likely to buy big-ticket items. One caveat is that the data in the example above only looks at a week’s worth of data, so the data over a longer time period may be quite different. Make sure to play around with a few date ranges to get a better overall picture, as well as to identify seasonal trends.
Geographical and language data
When choosing a target audience and creating user profiles, you’ll want to know where your audience lives and what languages they speak. For most brands, these answers are simple, but for more nationwide (or international) brands, it can be a little bit more complicated.
To access language and location data in Google Analytics, click the Geo tab under Audience:
This tab will give you a global heatmap of where your traffic is coming from:
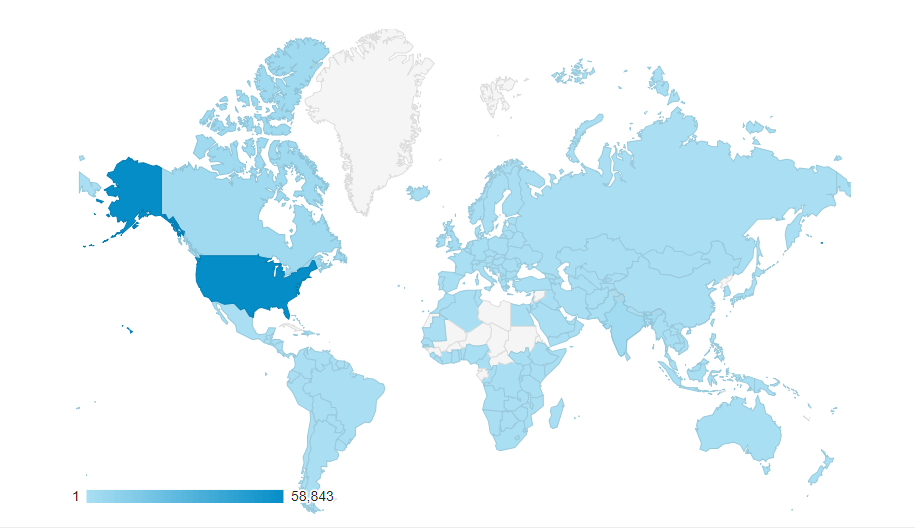
See where in the world your customers are coming from.
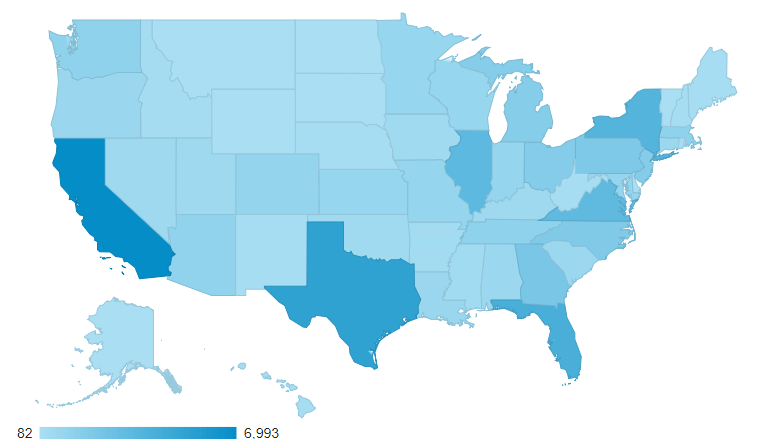
Get a state-by-state view of where your customers are located.
In the image above, we see that California drives the majority of traffic, followed closely by Texas. To dig even deeper, we can dig into which cities are driving the most traffic by clicking “City” beneath the map in the Primary Dimension menu for a nationwide view, or you can click an individual state to see which cities within that state are driving traffic.
Since Volusion is headquartered in Texas and we’re more than a little bit partial, let’s dig more deeply into which cities in Texas are driving traffic to this store by clicking it on the map.
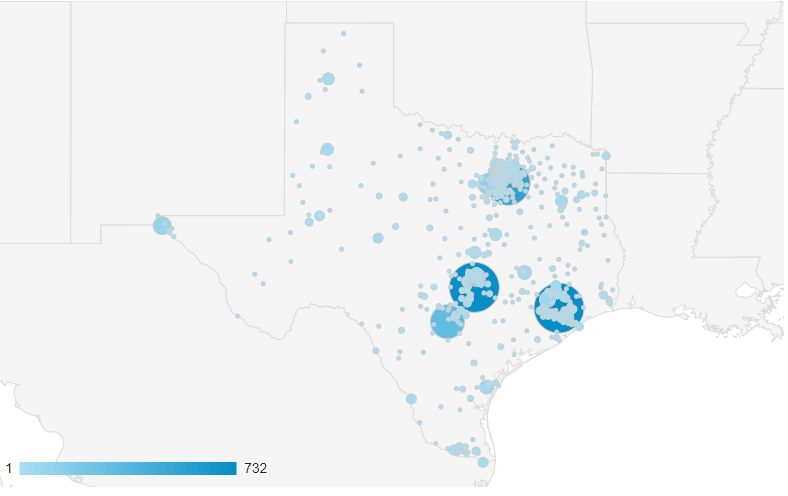
Get granular with specific city targeting to find hidden sales opportunities.
We see here that the metro areas of Austin, Houston, and Dallas are driving the bulk of traffic, with San Antonio following closely behind. Below this map, we can dig more into how each city is performing:
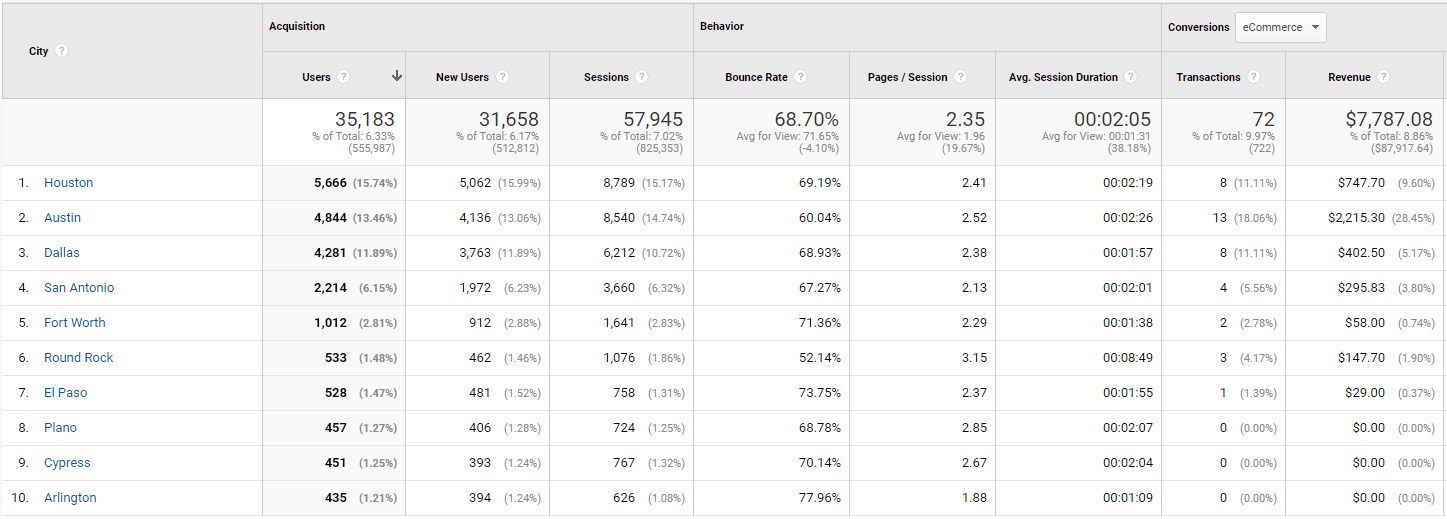
A city-by-city breakdown of traffic and conversions will help you pinpoint your buyers.
While Houston drives more visits, Austin is driving more sales. We’re also seeing that the Austin suburb of Round Rock seems to be very engaged with this site, looking at more pages for noticeably longer. When thinking about marketing materials and advertising campaigns, we should take both of these into account—all those folks up in Round Rock may just need a little extra push in order to convert. Some locally-targeted social media advertisements or a coupon campaign will help turn a lot of engaged visitors into loyal customers.
Test your target audience with a focus group
Once you have your target audience defined, it’s time to test how well your marketing works. One way to make sure you’re on track is to test your assumptions on real people. The best way to do this is to create a focus group of 5-10 people meeting your target audience profile. These testers can check out your site's journey from homepage to purchase so that you can get some good feedback on what you are doing right and where you need to improve. If you don’t have your site or any marketing materials (advertisements, social media posts, etc.) created yet, you can either create some samples for testing or find a website that very closely aligns with what you envision for your own site. If possible, gather people outside of your friends and family group to give you feedback—while your family and friends love you, they’re sometimes not willing to give you the honest feedback that you really need.
We’ve put together a big list of questions to ask your focus group designed specifically for online stores that will help you ask the right questions, whether you’re testing your homepage, product pages, or even social media posts. If you’d prefer to come up with your own questions, here’s a few examples to help get you started:
- Is it clear what this website sells or offers?
- Are the products organized in a way that makes sense to you?
- Are the product descriptions clear and descriptive?
- Is there any information left out of the product description?
- Is the site well-organized and easy to navigate?
- Would you purchase the products offered on this website? Why or why not?
- Is there anything you didn’t like or would change about this website?
Take this feedback to heart. If the group you gathered didn't seem as interested in your site and products as you thought they'd be, it might be time to go back to square one and reassess the audience you are marketing to.
As Lincoln famously said, "You can please some of the people some of the time, all of the people some of the time, some of the people all of the time, but you can never please all of the people all of the time.” Take this to heart as you embark on your targeting process—while you’re not trying to please everyone, you should get a majority of positive responses from your focus group. Too many negative responses either tell you that you need to work on your focus group targeting or your site itself. A strong target audience will provide excellent structure for your online store's strategy, and will be key to driving sales.
Part 3: Creating User Personas
User personas (also called buyer personas or customer personas), are semi-fictional characters that are used to help aid business decisions. Your user personas help you categorize the users of your site and products into more relatable groups, and will ensure that you understand who’s buying from you and what motivates them.
After you’ve decided on your target audience, you’ll want to create user personas to help represent the different types of people who make up your target audience. Since your user persona is meant to help you put a face (or faces) to your target audience, you’ll need to make sure to do your target audience research before creating a user persona. Since most of the user persona templates on the web are focused at professional marketers, we put together a user persona template designed for online merchants to help them identify their customers.
User personas do a lot for you, and will save you a lot of time and heartache down the road. Among other things, user personas:
- Help you make informed product decisions
- Help you craft persuasive content and marketing copy
- Help you advertise profitably by choosing the right ad groups
- Give you a quick, intuitive way to understand your customers’ wants and needs
If you haven’t created user personas for your online business before, or just aren’t sure how to get started, this portion of the guide will walk you through the process of creating user personas step-by-step.
Get to Know Your Existing Audience
If you don’t have an audience for your products yet, skip this step. If you do have an audience already, begin by gathering as much practical research and data as you can, from your Google Analytics account to past purchases to industry research or competitive data. Nobody will help you understand your customers better than your actual customers.
We recommend using the following avenues as ways to find information about your customers:
- Run a customer survey post-purchase to understand who is shopping on your site. You can do this by sending a link to a survey in the order confirmation email, and use a tool like SurveyGizmo to set up a brief survey
- Conduct focus group interviews with a group of loyal customers
- Review existing analytics, login details, email, or social media research to gain additional insights into who is visiting your site or buying your products. For more information, see “Using Google Analytics to Create Target Audiences and User Personas” in the section above.
Creating user personas for your online store
By this point, you should have a good idea of your target audience—the people most likely to purchase your products or engage with your content. For each of your target audiences, you’ll want to create at least one user persona to help you target the different types of people that make up your audience.
For example, if you’re selling coffee products, think about the different types of people who might drink your coffee. One user might be a mom who drinks a cup in the morning before the kids wake up—for this user, coffee is more about a comforting routine and relaxation. Another user might be a young student who needs extra energy to finish that big project—they’re motivated by energy, not relaxation. Another user might only care about taste, while another may want to impress their guests with rare and exotic coffee blends. All of these people purchase the same products, but for very different reasons. Marketing to the needs and desires of each group is key to making the sale, so segmenting your target audience into user personas is incredibly useful.
While there are various models out there for creating personas, we’ve created a user persona template designed specifically for ecommerce merchants to help categorize their customers.
Start by creating 2-4 separate personas to internalize the way potential customers perceive the brand and how the brand can solve problems. These are the main items that are included within user personas:
Fill in Demographic Details
From a demographic angle, you should know the following details for each user persona:
A name
Give your persona a personality, and assign a name and a photo to it. You can also give it a nickname, like “Blake the Techie.” This makes it much easier to remember the details of your personas and distinguish between them. You can also add a photo to help you keep track of who’s who.
Demographics
These details are the basis of your persona.
- Age
- Gender
- Location
- Marital Status
- Number of Children
- Occupation
- Annual household income
- Education level
Values & Beliefs
Define what your persona cares the most about. Expand on what she values most in life and how her behaviors coincide with these beliefs. At this level, you have the opportunity to make a brand connection that’s not possible at the demographics level, which is the true value of a user persona. The information you’ll want to include are:
- Personality traits
- Attitudes
- Values
- Interests or Hobbies
- Lifestyle
Goals and Motivations
At the end of the day, all purchases are driven by an underlying goal or motivation. Customer goals will vary widely depending on the products they’re buying, their own personality, and much more. Understanding a customer’s motivation for buying a product is the key to unlocking sales—to put it simply, if you don’t know why your customers are buying your products, you can’t convince them why they should buy your products. Think about the coffee example above—while all four of those user personas are purchasing coffee, they’re all doing it for much different reasons. Under your goals and motivations tab, include the following information:
- Goals: Why someone would want to buy your products
- Frustrations: What might prevent someone from buying your products
Understanding your customer’s goals and motivations is the most important part of creating a buyer persona. If you’re uncertain where to start, try asking existing customers or people you know that have purchased similar products in the past.
Dig into Psychographic Information
To really put the final polish on your user personas, think through the following questions for each. Keeping your persona’s behaviors, values, and goals in mind, start with the following information:
- Preferred methods of communication—does your persona hate the phone and prefer to ask questions online, or would they rather “speak to a person” than send an email? Understanding your user personas preferences will help you maximize your marketing efforts by sticking to platforms they actual use. Some ways to find a customer’s preferred methods of communication include: adding and analyzing communication preferences outlined on any on-boarding documents (did they consent to being contacted via telephone, email, mail, or some combination), sending out surveys, or having your customer service team ask when they have them on the line. You could also do a deep dive into research studies about preferred communication types. For example, millennials overwhelmingly prefer text and messaging apps, where as Baby Boomers are much more receptive to phone conversations.
- Favorite items that aren’t from your shop or a competitor’s shop—you might sell apparel, but it’s helpful to know if your persona is a health nut who loves Apple products, reads fanatically, thinks organic food is a waste of money, sometimes makes “ironic” or humorous purchases, and loves school supplies. All of these tastes can shape the look and feel of your online store, how you engage with your users, and how you can help them fit your products into their life. For example, if you’re fairly convinced your audience is comprised of Apple fans, you might consider adopting Apple’s design aesthetic with a sleek, minimalist, and trendy website design.
- Whether they take risks or play it safe—did your persona move across the country for college or stay close to home? On that note, have they ever moved to a new city on their own? How often do they try new things? Have they ever been on a blind date? Do they order the sea urchin off the sushi menu, or do they steer clear of sushi entirely? In general, the more risk-taking the audience, the more risks you can take with your products or marketing—within reason! For the more faint of heart, they’re far more likely to do extensive product research before buying, so make sure you provide plenty of content, pictures, dimensions, reviews, etc.
- Their motivations for using social media—or if they use social media at all. While this veers into demographic territory (it’s extremely helpful to know what platforms your persona uses), there are some bigger motivations at play here that you can speak to. Some people only use social media to converse with their closest friends, while others are comfortable striking up online conversations with complete strangers. Some use it to share every detail of their life, while others use it more sparingly. Some use it to debate, share opinions, and generate awareness about a politician or cause. Some people enjoy sharing funny memes, others insightful blog posts, others their current Spotify playlist. Some people just use it to be seen or to connect to other people. Each of these motivations can impact the way in which you interact with your audience on social media, the things you share, and the posts you write.
- Their dreams or higher aspirations—it’s one thing to know the technical or practical specifications of what your audience wants from a product. But there’s usually a bigger motivation at play, and it’s that motivation that often leads to the purchase. People who buy trendy clothes may do so to connect to other trend-seekers, just like people who buy college sweatshirts take pride in belonging to a community or “team.” People who buy professional photography equipment may hope for a breakout career in photography, while people who buy less expensive equipment might just want to pursue an interesting new hobby. Uncovering your persona’s higher motives will impact everything from the images you share on social media to the story you tell about your products.
When to Refer to Your user personas
What’s the benefit to all this, besides taking an interesting break from product uploads? Well, it all goes back to that understanding part. The better you understand your customers, the better you can speak to them. By the time you’re done, you should feel like your personas are close friends, and this will come across in your writing. Warm and friendly website copy and social media posts are refreshing and differentiating, and the more you can prove that you know what your audience values, the more they’ll trust you for return purchases.
Another benefit is that you may discover a persona that you can’t relate to at all, which means it’s a great time to find someone who can before you make any mistakes!
The last benefit is that as your business grows and you hire marketing staff, introducing them to your user personas is one of the quickest and most effective ways to inform their writing, design work, photography, product selection, social media efforts, brand consistency, and much more. This is true if you plan on outsourcing any of your SEM work, too.
User personas are an absolutely integral part of any relatable, targeted, and cohesive marketing strategy, and the benefits will impact business goals ranging from conversions to repeat customers and brand ambassadors.
Part 4: Establishing a Tone of Voice and Brand Persona
Once you have a solidified brand and a target audience in mind, start thinking about how you want to speak to your audience. This is where the personas we discussed in Part 3 will come in handy. When you feel like you’re writing for a specific person, it’s much easier to be persuasive and engaging.
Creating a messaging portion of your style guide will help document and ensure your company’s tone and voice stay consistent. Here are some rules and preferences to outline while crafting your brand persona. To help you craft a brand personality, we’ve put together a complete branding plan template designed specifically for online merchants. Just fill in the blanks, and you’ll be off to a great start with your ecommerce store.
Build your Brand Positioning Statement
So what exactly is brand positioning? Think of it as the perception your business takes in the minds of customers. In other words, positioning is how you want your brand to be perceived by others.
But how does your brand position differ from your user personas? Good question. The former helps you determine your position in the marketplace. User personas, on the other hand, tell you about your ideal customers within that marketplace.
The first step of this process is to build your positioning statement. This is a sentence that defines the core of your company’s brand. You’ll recognize it as distinct from your mission and values statement because it addresses benefits to a specific customer base as opposed to how your brand aims to impact the world. You’ll want to create a unique brand positioning statement for each of your target audiences with your user personas in mind. Here’s a simple template to help you build your brand positioning statement:
- For (insert customer base), (insert company name) offers (insert product and key benefit) to provide (insert competitive advantage).
- Example: For economical fashionistas, Sally’s Boutique offers affordable, trendy women’s apparel to provide ultimate comfort.
- Example: For high-tech gadget lovers, Gadgets Galore offers the newest electronic products to provide the latest offerings to customers.
One final note: your positioning statement should remain an internal guide to craft your overall business strategy. You can spice up the key features of the statement to use for sales and marketing tools, but it’s mostly meant to help guide your own branding messages.
Craft your Tagline
Your Tagline is a short and succinct promotional slogan that a company uses to describe who they are and what they do. Taglines can also be used for products to increase sales as well. Some examples include: Nike’s “Just do it,” Skittles “Taste the Rainbow,” and DosEquis “I don’t always drink beer, but when I do…” It ultimately captures the unique way you serve customers. Think back to your value proposition from your branding plan in Part 1. You don’t have to have a tagline for your brand, but it can help customers understand what you sell or help reinforce your unique brand. Have this handy as you start ideating and let how you impact customers be the focus point.
At minimum, your tagline should be functional, personable, and memorable. Keep it to about three to seven words so it’s potent and to the point.
Find your Brand Voice
Every brand’s voice is unique, and serves as a competitive advantage in the marketplace. Defining the brand voice is a key component of shaping your brand’s identity, and should reflect your company’s personality in every communication medium, from your product descriptions to your social media posts.
Define the purpose
To begin the exercise, define why your brand exists and whom it serves. What makes it different from every other brand out there? What is the one thing you want every customer to know, and why is it special? Most importantly, what does your brand stand for? Tying your brand voice back to the purpose of your organization makes defining your brand voice a much easier exercise.
Think of your brand as a person
If defining your brand voice in a few words is difficult (and let’s face it, it is!), take a step back and think of your brand as a person. “What do they look like?”, “What do they like?”, “What are their dreams?”, “Where do they seek advice?” are all questions you can ask yourself. Once you identify someone to speak with, you can shape your tone and voice to their needs.
Try encapsulating your brand voice in three words. Sometimes it helps to define what you are and what you’re not in the same sentence. For instance:
- Trusted, but not boastful.
- Clever, but not silly.
- Helpful, but not pushy.
Clarify your Tone
Whereas your voice conveys your brand’s overall personality, its tone is the attitude with which you say it. In other words, your voice should remain the same in every piece of content you write. However, the tone of each piece may need to change depending on what you’re saying and who you’re saying it to.
- Are you friendly and informative?
- Concise and inspiring?
- Intricate and empathetic?
- Inclusive and straight forward?
Keep in mind that the length of each sentence also conveys tone. Shorter sentences are quippy and clever. The longer the sentence, the more authoritative and serious you’ll sound.
Write Down your Content Best Practices
Get granular and specific about how you want your writers to represent your brand in written form. This will help you be consistent across all of your copy, which is especially critical if more than one person is writing on your website or social media accounts. We’ve put together a style guide template that you can fill out for your own store.
Make sure your style guide addresses the following:
- Use of contractions. They can help a brand sound more informal.
- Use of expletives. Some companies get a lot out of the shock value, but others will want to steer far clear of profanity.
- Use of emojis. If using emojis, in what pieces are they permissible?
- Use of slang and jargon. Or is plain English your one and only?
- How to cover information. Concise or involved and detailed?
- Paragraph length. How much white space do you want to see? Bullet points?
- Active or passive voice. We usually recommend the former.
- Use of hyphenation. Some editors have really strong opinions about this one.
- Words to avoid. “Interwebs” anyone?
- Capitalization. It can be tricky for words like email (Email?)
- Numbers. Do you want them spelled out or written numerically?
- Punctuation. From colons to commas, make sure they’re uniform.
Make your Messaging Consistent
Effective messaging clearly communicates your brand and core values. Whether it’s a tweet, a landing page, a webinar, or a blog post, your voice should be consistent across all channels. Don’t create a jarring experience for your customers by having a relaxed, friendly tone in one communication medium and contrast it with a voice of sass and sarcasm in the next. Every "touch" you provide to customers should reflect the brand voice and who you represent as a company.
Part 5: Building your Brand’s Visual Design
Consistent visual branding gives legitimacy to your company and keeps your business feeling consistent across all entities, including web, print, press, social media, and even your packaging and shipping methods. The best way to organize your branding principles is through a style guide.
Whether you’re a one person team managing it all on your own; you work on a team with multiple people; or you contract freelancers, collaborators, or third parties; it’s important to have a design style guide to consult for all of your branding needs.
There are a handful of key elements needed to craft an effective design style guide, so let’s jump right in. If you want to follow along with the content in this article, check out our fill-in-the-blank branding plan template. We made it with online merchants in mind to help them craft their own unique branding plan and start making sales.
Get Inspired
Whether you’re taking on site and logo design yourself or hiring a professional graphic artist, it is always a good idea to start getting some inspiration by looking at what other people and companies are doing. Different sites offer great insight into current trends, as well as an idea of where design is headed. Take some time to absorb what’s out there and consider why you like what you like, and dislike what you dislike. Use these as starting points in your brainstorming process, and you’ll see how much better your final design product gets.
Color
The most important visual element aside from your branding is your color palette. Color is an incredibly valuable tool in crafting your brand because it plays a large role in how your brand is perceived, its memorability, and its potential to attract your target market to begin with.
Think about the message you want your brand to convey.
- Who is your audience, and how do you want them to feel about you?
- Do you want to be seen as loyal and trustworthy, or carefree and fun?
- What kind of feelings do your competitors elicit?
- How can you differentiate yourself from similar businesses?
As a rule of thumb, select just a few colors for simplicity's sake.
View your Logo in Greyscale
Remember that it is also important that your brand does not rely on color alone.
For example, there will be times when your logo will appear in black and white, such as on a receipt or if it ever gets printed out on a non-color printer. If changing your logo to black and white or grayscale renders parts of it illegible, consider using higher contrasting colors. It is actually very common for designers to work in greyscale first to make sure their design is effective, and then add color as one of the last steps.
Logo
Your company’s logo is one of the more important aspects of branding. A logo is consistently visible on all aspects of your offline properties: receipts, letterheads, T-shirts, banners, and every page of your ecommerce website. For something that can be so small, the impact that a well-designed logo has on your brand experience and online store cannot be overstated. Whether you’re designing one yourself or paying a professional, it’s a good idea to be familiar with some basic aspects of online store logo design.
With that spirit in mind, let’s dive in and discuss all things logos!
Make it Versatile
Versatility is paramount when considering logo design. Remember that your logo will be seen at many different sizes, and you will probably need to have copies in different file formats. You want to make sure that your logo will be visually readable at all sizes and colors. An effective logo is one that is crisp and simple, meaningful and evocative.
Think About Longevity
Good design is timeless. Many of the most popular and most recognized logos have changed very little since their creation. Drastically changing your logo often can have adverse effects, such as creating confusion and decreasing memorability. Your goal should be to get it right the first time, and only make minor changes when needed.
Opt for a clean, classic style to ensure your branding has some staying power.
Avoid Busy or Complex Designs
Aside from issues with scaling, a busy logo can create visual dissonance in the viewer, and will likely result in negative associations with your brand. Keep your design clean and simple, with only a few key elements. Avoid using too many fonts as well, as this also adds to a feeling of unrest.
Online Store Logo Design Checklist
Throughout the creative process, have your end vision in mind. Always keep the principles of good design in mind, and ask the following questions about your final proof:
- Does your logo have an attractive, professional appearance? You want your logo to speak highly of your business, and instill a feeling of trust and credibility to your customers.
- Is your logo a simple, memorable shape? Simple shapes are pleasant and easier to remember. The main goal of your logo is to stick in the viewer’s mind, so keep it clean and elegant.
- Does your logo design convey a clear impression of your brand? You don’t have the chance to talk to everyone who visits your website, so your logo and site design often speak for you. Consider the tone you want to convey, and have that message reinforced in your design choices.
- Is your logo a versatile and scalable image that is appropriate for both print and digital media? Your logo will not exist solely on your website. In order to maximize your logo’s effectiveness, it is imperative to expand mediums. Consider your design in relation to its context. How will it look on a business card? On a T-shirt or jacket? In a magazine or on a billboard?
- Is your logo employing an aesthetic that is attractive both in black and white and in color? Color is highly important, but be prepared for your logo to be seen in greyscale. If your message is lost or unreadable once the color is gone, you have a problem.
- Is your logo a timeless design that does not depend on modern fads? Chances are that you want your company to be profitable and sustainable for years to come. Plan on sticking with your logo design for a long time as well, as making too many changes will negatively impact your brand recognition and confuse your customers. Instead of relying on a fad, look for something with more staying power.
- Does your logo have a color scheme that matches your brand personality? Color choice can seem unimportant, but there are many subtle and intangible ways to craft your brand message through effective utilization of color.
A logo gives your brand an identity, but also does so much more for your business. Acting as an extension of who you are and what you care about, a logo gives your customers a way to connect with your business, something to support and rally around. It behooves you as an entrepreneur to take logo design seriously and develop a logo that reflects your spirit as an individual and as a company.
Typography
Let’s face it—most of the communications with your customers will be through type. This means you definitely want it to look good. Since type is such a critical branding element, it’s important to choose the right font(s) that will not only make a great impression of your brand, but feel consistent with your goals and personality.
Use your style guide to identify the name(s) of the font(s) you’re using and where to obtain them. Google Fonts is a great resource with lots of free fonts that are easily accessible and web-friendly. While considering fonts for your brand, remember that fonts inherently embody moods and feelings. For example, if you want your brand to be upscale and sophisticated, consider using a serif font. For a modern flair, try introducing a sans serif font. Ultimately, it comes down to what you want your company to represent and what feels right for it.
- Understand the different font types. There are tons of different font types out there, ranging from the extremely simple to the stupendously weird. Each has its own set of uses, so make sure you have a bit of background in each of the fab four: script, decorative, serif, and sans-serif.
- Check that fonts are legible and readable. Two things to consider when choosing your store’s typeface are legibility and readability. While legibility and readability sound very similar, they're actually quite different. But together, they work to effectively communicate your brand's message.
- Legibility is being able to distinguish specific letterforms from each other. (Think of a letterform like the specific structure and shape of a letter in that typeface, complete with the correct width and spacing, and any details like serifs or patterns.)
- Readability refers to how text is arranged so that the eye can easily read the content.
- Pick no more than two fonts and make sure they’re consistent. Outline 1-2 fonts maximum so that your brand looks polished and not busy. Dictate their placement and usage, such as body copy and headlines. Everywhere your brand goes, you want to make sure the type treatment is the same.
- Make sure it works with your logo. Many logos are so visually distinct that they do not use text at all, but if a logo contains text, it should be easy to read and complementary to the overall design. A font that dominates or competes for attention will take away from a logo, and at small sizes, an ornate font becomes increasingly difficult to read.
Imagery
Colors and fonts are wonderful and critical elements of your branding, but what’s really going to add life to your brand is imagery. Identifying appropriate imagery in your style guide will help anybody who touches your brand understand what types of photography flatter and showcase your brand in the best way.
A good imagery design process usually takes numerous rounds of brainstorming, sketching, and conceptualizing to reach an idea that fits the message a brand wants to convey. Keep these in mind as you kick off:
- Create a mood board. Compile a small collection of images that clearly convey what your brand embodies and present it in a mood board format. Perhaps your brand is minimal and chic, so you opt for simple images with solid colored backgrounds. Find some similar images and place them on your mood board. Maybe you run a children’s clothing boutique and the imagery should be colorful and full of energy with lifestyle photography. Show it in your style guide!
- Choose the type(s) of imagery you want to represent your brand. Remember that you don’t have to use images as your imagery. In fact, there are a number of options you may choose to incorporate, like photos or illustrations, representational or abstract, conceptual or literal, stock or custom.
- Know your image types. A raster image is an image that is made up of pixels. Common file formats are .jpg, .gif, .bmp, and .psd. The biggest issue with pixelated images occurs when the picture is enlarged, as this causes the picture to become grainy. Raster images also tend to have larger file sizes as well, which can slow down your computer—something to keep in mind when picking static imagery for your site.
- Use stock images creatively. Your imagery should be unique to your business. If you have purchased an image from somewhere online, chances are that someone else out there is using that image as well. Since the whole purpose of a logo is to create an association with your brand, be sure to use stock images in creative ways that other entrepreneurs and business owners have not.
- Avoid clichés. Avoid imagery that is used ubiquitously—swooshes to represent innovation, gears for technology, blue smoke for e-cigarettes. Create a concept that is unique to your business. Cliché imagery is often the first ideas when someone brainstorms.
Part 6: Creating your Brand’s Mission and Values
Your brand’s missions, values, and overall purpose are a critical part of your larger branding plan. We’ve created an easy, step-by-step branding plan template to help online merchants craft their mission statements and values. Additionally, we show you how to use this information in your marketing materials to help engage and retain your customer base.
Pen Your Mission and Values
These are like a compass for your brand—when you’re uncertain what to do, they’ll point you in the right direction. They’re the vision you have for your business, what you hope to accomplish with it, where you’re headed in the future, and the true north that guides all that you do. Just as importantly, they’ll tell your customers what your business stands for and why it is that you do what you do.
Writing a mission statement
The Harvard Business Review recommends three key components to an effective mission statement: verb, target, and outcome. If you’re having trouble writing a mission statement, use this simple fill-in-the-blank mission statement template:
“At [company name], our mission is to do [something] in order to help solve [a need].”
By listing what it is that your company plans to do, and why they plan to do it, you’ll have a much clearer idea of the purpose of your business, which will help you create your branding plan. Make sure to include your mission statement on your About Us page to give customers a simple one-sentence summary of why they should care about your brand.
List out your company’s values
As for values, state as many as you want—just make sure they’re clear, succinct, consistent, and honored. These may include providing high-quality products at the most competitive price, giving back to a community or charity, or providing industry-leading customer service. Your values are your way to state what your company believes in—an important first step towards getting customers to believe in your company.
Your mission and values statements should explain the reason your business exists in the first place. They should give you, your employees, and your customers a clear picture of what your company does and why you do it. Getting clear on this driving purpose will help you go beyond the products you serve and the people you serve them to.
Create a Brand Story
Humans love stories. Maybe that’s why all the most recognized brands have such great ones. Your brand story is the story you tell your customers about your business, and about why you do what you do. Without a clear sense of your company’s purpose and values, writing your brand story will be very difficult. However, especially for small brands, a brand story can mean the difference between life and death. Customers like buying from brands that they feel a connection to, and without a brand story, they’ll have no reason to choose your brand over your competitors.
Elements that contribute to your brand story include:
- Your company’s history
- Your company’s founders
- Your company’s values
- Why your founders started the business
- What problems your company hopes to solve
- Any philanthropic, charitable, or social issues that your brand supports
- Anything else that makes your brand unique, likeable, or memorable
Some brand elements that help customers “read” your brand story include:
- Visual cues
- Tone of voice
- Your packaging
- Business cards
- Employees and internal company culture
Spend some time creating your brand story. If you can captivate your audience, you’ll see the difference in sales.
Part 7: Identify your Unique Selling Points and Craft your Value Proposition
Your Unique Selling Points (USPs) can help you as you start to think about your value proposition. USPs are those special qualities that your brand or products bring to the table. Why would someone choose your product over another? What are you offering that no one else in the market is? Answering these questions can help you pinpoint your value proposition and define the special qualities that your brand possesses. Check out our in-depth branding plan template for examples of USPs and value propositions, and then fill in the blanks to create a value proposition for your own online store.
Examples of USPs include:
- Unique product benefits or characteristics. If your product offers a benefit over the competition, don’t hesitate to tell people—or even better, show them.
- Awards or industry distinctions. Including this information prominently on your website will help your customers trust you, which is vital to making a sale. If you don’t have any of these, do a little research about the different awards or trust signals in your niche and how to get them. Even a positive review from another website or publication can generate a large amount of trust, especially if it’s a publication that your user recognizes.
- Partnerships with organizations or charities. This can be a great way to show that your brand is willing to give back.
- Social enterprise policies. This is a great way to show that your brand cares about the same issues as your customers, and is willing to show it.
- Excellent customer service. If possible, back this up with testimonials or statistics.
Your Value Proposition is a statement of assurance that your brand will use to guarantee customers a beneficial or quality experience from their services, products, or company values. Simply put, it is an explanation of why customers should buy from you specifically. Your value proposition will appear on virtually every part of your website, so it’s important to take the time to create a good one.
The right method to frame your product’s value proposition is to put yourself in the shoes of your customers and think on the following lines:
- What benefits does this product provide me?
- Why is this product a better choice vs. a competitor’s?
- What proof do I have that this product does what it says it will?
At minimum, your value proposition should be clear, appealing, and credible. To give you an example of a value proposition, let’s look at our own: Volusion’s ecommerce software is the only ecommerce software designed specifically for the needs of small business owners. We think that this does a pretty good job of summing up why we’re different from (and, dare we say, better than) the competition.
P.S. If you’re a small business owner (or plan to be) and found our value proposition is persuasive, go ahead and sign up for a free 14-day trial to see for yourself what makes us better—we put a lot of love into our platform, so we’d love for you to give it a try.
Part 8: Reinforcing your Brand on Social Media
Social media allows businesses to tell their brand story in a creative and innovative way. Whether it’s through a fun campaign or rich content, social media has the capacity to allow your brand to be seen from an entirely different angle—thus, allowing your business the potential to acquire more target groups than ever before. Create a solid branding plan for your online business by filling out this branding plan template in order to help your social media accounts become one of your most valuable traffic sources.
To help you craft your social media persona like a pro, we’ve provided a quick guide featuring creative tips, free photo editing resources, and more.
Choose your Channels
Should you even use social media for business? The answer is simple: yes. Nowadays, a social media presence is expected by most customers, and it’s often one of the first places a customer goes to ask questions, sing your brand’s praises, or complain. A good social media presence will help you build a following for your brand, as well as give you a valuable advertising platform.
Choose which social media channels are best for your business based on your particular target groups, industry, business type, budgets, and location.
As you’re identifying which platforms you want to use, be sure to consider all of them. Facebook, Instagram, and Pinterest are good places to start, but don’t sleep on YouTube, Twitter, and other platforms that may be a better fit for your brand. Think about the general audience that you’re looking to engage with, as well as the type of content that you plan on sharing. Are you going to be publishing tutorial videos? Quotes and sayings that align with your brand’s mission? Blog articles? Who specifically is likely to engage with the type of content you plan on publishing?
This approach will better inform which platforms you should be focusing on, as you certainly don’t need to adopt them all.
Update your Social Media Profiles
Profile Pictures
First things first: start with a great, high-resolution profile image. The images and content featured on your social media profile are not only a direct reflection of your brand, but they can also be a good indicator of the quality of your offerings. You want to make sure that you are delivering a strong brand message, and nothing helps more than having high-quality profile images.
It’s almost always considered a best practice for your business profile’s main picture to feature your logo. Make sure that your logo is clear and easy to read, and avoid using any type of design or images on or behind the logo itself. Having logos as profile picture tends to give businesses (especially startups) more credibility. It’s an easy way for people to identify your business as such, and differentiate it from personal profiles or even spam.
Cover Photos and Headers
Cover photos offer a great opportunity to show on a broader level what your business is about. Since they are the biggest images (literally, dimension-wise) featured on your profiles, they can be the most distracting item for a viewer. For this reason, it is very important to use an eye-catching image that will portray the core message of your brand. To ensure better quality and simplicity, avoid using text or any type of graphics on the image. The only occasion where it's OK to use text or clean graphics on the cover photo/header would be to promote a particular event or sale. Other than that, avoid it as much as possible.
Both profile and cover pictures should be changed periodically, especially with the change of seasons, holidays, new merchandise arrivals and special events.
Create a Content Schedule
Next, you should create a content schedule. Just like it sounds, a content schedule is all of the content you plan to feature throughout a period of time, organized into a document of your choice. It’s just like taking notes in college: everybody has a different style of doing it. If you aren’t sure how to go about creating one, here's a great resource that provides templates for you to download. Organizing your content not only helps you plan a strategy, but also enables you to be consistent in posting.
Make your Feed Consistent
Make sure that your branding, products, and company info are consistent across all platforms. Before you start publishing, run through your profiles and ensure that all the elements of your business are presented in a consistent way. Your brand should be recognizable from one platform to the next, and that includes your product listings, profile images, bio, and general brand voice. While the content itself may differ, it’s critical that each platform accurately calls back to what your brand is about, so as not to confuse consumers.
Your feed is just as much a part of your branding as the individual pictures themselves. Here are two apps we suggest to keep the photos on your channels fresh and consistent.
Planoly
Planoly allows you to manage, plan, and schedule your Instagram posts from the comfort of your computer or on a mobile device. Recently, they announced that they allow for automatic publishing to Instagram, freeing up even more of your time.
It’s a beautiful app that allows you to move photos around to create a cohesive Instagram feed. This is a fantastic feature if you have a handful of photos that you’d like to schedule throughout the week and aren’t sure which photos will look best next to each other.
A Color Story
If you are hoping to create a beautiful and cohesive Instagram feed, you’ll want to take a look at apps like A Color Story. With over 100 crafted filters and effects to help your photos pop on a follower’s feed, you’ll wonder how you ever edited your photos without it. While the app offers a handful of free filters and effects, if you’re planning on using this as your go-to editing tool, it is worth investing in some of the filter packs and effects that range in price from $0.99-2.99.
Craft a Good Story
The most successful brands are the ones that craft a lifestyle concept around the message they’re trying to deliver. This gives people something they can emotionally relate to. With a little bit of grace, narration, and artistic value, you can use images to tell your brand’s story. Refrain from only posting images about your services or products. Think on a larger level, and identify other things that relate to your business.
Adopt an Overall Theme
Creating an overall theme for your images can provide consistency and help reinforce your brand identity. It can also make it easier for people to quickly familiarize themselves with your brand. You can create an overall theme for your images in many different ways. For example, some people use the same photo filter, while others use a particular angle or color for all of their images.
Update your Style Guide
Many companies' style guides don’t cover social media image posts in much detail, which is a big mistake. Without a section in your guide, the teams who design and upload your posts could miss the mark. Don’t wait until a photo is posted before you realize it that looks nothing like any of the other posts on the page.
The good news here is that your company style guide can include everything you need to craft a post that will look good and, more importantly, be consistent.
Start by designating the color tones you want to stay within. For instance, if the majority of your store’s posts use a blue hue, your new red post is going to look terrible. For most posts, using your company’s suggested colors will work just fine so long as you’re filter-specific.
Use the same basic style for all of your posts—the font choice, layout, and style should remain the same.
Generally speaking, graphics posts will have heavier use of text than image posts. A tip for social media posts on platforms such as Instagram, Twitter, or Facebook is to use text that is bold, big, and easy to read. This likely means a sans-serif font that can be digested within a few seconds of viewing the image. Make sure your style guide suggests a font that is not hard to read.
Design with Each Channel in Mind
The biggest tip when designing a post is to be cognizant of the network for which your post is being designed. Likewise, if the post is being used across multiple networks, be aware that each network has different size and resolution requirements. Sprout’s Always Up-To-Date Social Media Image Sizes Cheat Sheet is an easy way to find out if you are using the right image dimensions, and Pic Resize is a great tool to resize any images you might have. You may also want to implement a rule that says you or someone on your team will test your post across all networks before going live.
Creating social media posts for your store can be difficult, and may seem a little overwhelming with so many options out there. The most important thing to remember here is to experiment with what works for your brand.
Part 9: Brand and Reputation Management
Your online presence—whether it be your personal social media, brand, or website—is shaped by your online reputation. It’s how others see you.
Since feedback from customers or anyone with internet access can be freely entered into a variety of websites and social media platforms, your reputation is online and public like never before. Therefore, it is critical that you have a process for online reputation management (ORM).
In this section, you will learn some simple steps to measure and manage your reputation online.
Understand What Your Online Reputation Is
Whether you have an ecommerce website or are a public official such as a politician, your reputation is your most important attribute. Trust is important in any relationship and is directly related to your reputation.
Building a positive online reputation is critical to making sales, since customers will only buy from sites they trust.
Online reputation management refers to the process of generating, maintaining, and promoting your company’s reputation. Customers use a wide variety of sources to form perceptions of a brand’s trustworthiness, including online reviews, social media accounts and posts, and the quality of the company’s website and content. Building a positive online reputation is critical to making sales, since customers will only buy from sites they trust.
Company Reputation Management
Depending on the size of your company, online reputation management can be as easy as answering a few Facebook messages each week or as complex as organizing, evaluating, and responding to thousands of emails, messages, calls, reviews, mentions, videos, and more. We’ll focus on the online reputation management techniques that work best for small- and medium-sized businesses, since most ecommerce merchants fall within this category.
Managing Product Reviews
To start, put yourself into your customers' shoes and think about how you shop online. If you're on Amazon, chances are you look at the product reviews and the "Customer Questions and Answers" section to see what other people are saying about the product.
Would you buy a product that has mostly 1 star reviews? Probably not.
One of the key components of maintaining a positive online reputation is ensuring that you’re offering a high-quality product—it’s much easier to get positive reviews and mentions if your product is noticeably better than the competition.
Managing Your Online Reputation within Google and Other Search Engines
Let’s say you're looking for a coffee maker and are interested in Nespresso. The reviews are good on Amazon, but the price is higher than most others, and before buying you want to do a little more research about the company. So, you go to Google and type in the brand name.
When you do so, you’ll see that besides organic links to the Nespresso website, there is a Twitter feed from the brand as well as the company social media apps like YouTube, Instagram, and Facebook pages. All of this information is critical to a brand’s online reputation. If you see negative results when Googling the name of your business or your business’ reviews, addressing these should become a top priority. Ideally, you’d like to solve the customer’s problem so effectively that they remove the negative review and replace it with a positive (or at least neutral) review. At the very least, you want to show anyone else reading the review that you’ve responded promptly, politely, and have taken every reasonable step to resolve the issue.
Managing Your Reputation on Facebook
Facebook is a place where people can go to tell the world how much they love your product or company—or how much they hate them. Facebook has become one of the most popular ways for customers to reach out for support, and the last step for most unsatisfied customers is to leave negative reviews on Facebook and other platforms.
Customers pay attention to what people are saying about you, but also what you’re saying back—if you’re responding to user issues quickly and effectively and displaying how much you care about customer satisfaction, you can not only mitigate the effects of the negative comment, but actually build brand trust. Customers love to see brands go the extra mile for customers, and great customer service is the best way to retain customers.
Decide How You’ll Respond to Negative Reviews
The best way to respond to negative comments or reviews is with a helpful, positive response. As a business, you should be respectful and sensitive to the poor experiences that your customers face and take every reasonable step to resolve the issue and ensure that the customer is happy. This is how you should communicate, especially if you want to build a solid online reputation.
Even if a customer review is grossly misinformed or misleading, you must approach it calmly and professionally. The surest way to damage your reputation is to be rude and lack empathy with your customers, or to be defensive. Show that you understand the source of the customer’s unhappiness, and display that you’ve done everything you can to make it right.
If future readers see that a customer is still unhappy after you’ve bent over backwards to try to solve an issue, they’ll usually side with the voice of reason. Also, you may often find that giving the customer the benefit of the doubt can turn into a positive experience—they may be having a unique problem that helps you improve your product, or you may be misunderstanding the source of their dissatisfaction entirely.
If your reputation takes a hit, you should act quickly. In most cases, you should be able to work through negative reviews with some work. If the negative publicity issues are too large, you may want to consider a reputation management company or a public relations firm. They can work on your behalf to manage reviews and online discussions with customers, and can also put out press releases and other positive media and help you make sure that both your content and your interactions with customers are high-quality and effective.
Choose Your Online Reputation Management Tools and Services
There are several tools and services that can make it much easier to manage and maintain your company’s online reputation.
- Google Alerts: One of the best reputation management tools is Google Alerts. Here you can enter your brand, product name, or any keyword and choose how often you want Google to send you any mentions of your keyword. This is a great way to instantly know if someone has said something about you online, and can be key to finding and fixing negative reviews before they’ve been seen by thousands of potential customers.
- Feature Reviews Directly on Your Website: Collecting the bulk of product and customer review on your own website has a number of advantages. Customers have to navigate to your product pages to view them, increasing the likelihood of a sale (if the reviews are good, of course). We use the new Volusion V2 software as our ecommerce platform, which includes a Yotpo reviews plugin. Other software programs for reviews include PowerReviews, Bazaarvoice, and TrustPilot. Besides offering social proof, these programs can also help with your search engine optimization.
- Facebook Notifications: Review your Facebook Notifications regularly. Since Facebook owns Instagram, you can see all comments, messages, and likes from both social sites for your company in one dashboard.
- Twitter Notifications: Similar to Facebook, you should review your notifications regularly and respond in a professional manner. Knowem allows you to search your brand across a host of additional social networks as well as the USPTO (US Patent and Trademark) site.
- If you sell on Amazon, you'll want to remember to review it for your products or for any new shopper questions or product reviews. Additionally, Amazon has a program called Vine where you can send your products to professional reviewers who are screened by Amazon to give your product reviews. This is especially important if you are launching a new product and have few product reviews.
Protect Your Brand Name
One of the most critical but commonly-overlooked forms of reputation management is copyright enforcement. To protect your brand, you should have your brand name trademarked with the USPTO. Once you have the trademark, there are some protections provided by Google and Amazon for how your brand name is used on their platforms.
Be diligent about enforcing your copyright—knockoffs and imitators can do serious damage to your brand reputation. Furthermore, you do not want them to use your brand name in online ads—it creates confusion with customers and could be a huge headache for you.
Leverage Positive Reviews
Reputation management isn’t all about avoiding a negative reputation. Building your brand reputation gives you some of the best marketing opportunities available, such as testimonials, recommendations, and positive mentions of your brand on blogs, social media, or via face-to-face interactions.
If you have positive reviews, a strong reputation management strategy includes leveraging them in your marketing:
- Retweet glowing reviews and positive shoutouts
- Create graphics to show in your social media marketing programs, especially Facebook and Instagram
- Include testimonials on your homepage and product pages
At the end of the day, it’s trust that drives sales, so make sure to protect your most important asset—your company’s online reputation.
Part 10: How to Measure the Results of your Branding Efforts
Your leads, customer recognition, and ultimately, sales will be the true tells about the success of your branding efforts. However, this information won’t just fall in your lap—you’ll need to do a little bit of work setting up and configuring your analytics accounts. Also, if you really want to see results, you’ll need to create and adhere to a branding plan for your store. We’ve created an in-depth branding plan template to help online merchants set up a unique branding plan for their site quickly and easily—just fill in the blanks, and you’ll have a valuable resource to refer to whenever you’re making branding decisions about your website (which is almost always).
Getting Started with Google Analytics
Google Analytics is an incredibly valuable, free tool that is provided by Google themselves. Utilizing it gives you the opportunity to dive deeper into who your customer is and how they behave on the site. It’s important to understand this data because you can have all the information in the world, but if you don’t know what it is and how to use it, it’s worthless. By becoming familiar with GA, you will have a leg up on the competition and help provide a better user experience for visitors.
Integrating your store with Google Analytics is a simple process that will give you tons of tracking and statistics regarding your store, like incoming web traffic, visitor statistics, and more.
Best of all, Google Analytics is totally free! You just need a Google account and, of course, a Volusion store.
Getting Started
The first thing you have to do is create a Google Analytics account. Visit www.google.com/analytics and follow these steps:
- Click Create an Account in the top right corner.
- Click the Sign Up button.
- Select Web Site, then select a Tracking Method.
- Set up your Web Property by entering your Website Name, Website URL, Industry Category, and Time Zone.
- Next, enter your Account Name, select your Data Sharing preferences, and click Get Tracking ID.
- Accept the Google Analytics Terms of Service.
- Copy the tracking code provided—you’ll need to paste this code into your Volusion store template.
Next, you need to copy the JavaScript code provided by Google (see step 7, above) into your store.
Installing the Google Analytics Code
- Go to Design > File Editor in your Admin Area.
- In the Shortcuts table on the Live Edit page, click Template_xx.html (where "xx" is the number or name of your Volusion store template).
- In the Live Edit window, look through the first section of your template's code to find the closing head tag marked "</head>". You can also use CTRL+F to search for the term "</head>" on the page.
- Paste the Google Analytics JavaScript code into the editor window just above this tag.
- Click Save and you're done!
Please be aware that if you are using one of our responsive templates, the steps above are already complete, but the part of the code containing your ID number is generic and must be customized. Look for the following text:
<!-- Google Analytics: change UA-XXXXXXXX-X to be your site's ID. -->
<script>
(function(i,s,o,g,r,a,m){i['GoogleAnalyticsObject']=r;i[r]=i[r]||function(){
(i[r].q=i[r].q||[]).push(arguments)},i[r].l=1*new Date();a=s.createElement(o),
m=s.getElementsByTagName(o)[0];a.async=1;a.src=g;m.parentNode.insertBefore(a,m)
})(window,document,'script','//www.google-analytics.com/analytics.js','ga');
ga('create', 'UA-XXXXXXXX-X', 'auto');
ga('send', 'pageview');
</script>
Customize the part in bold above with your own unique ID number.
Mobile Analytics
In addition to tracking sales on your desktop site, you can track sales that come from mobile devices. To do so:
- Go to Settings > Config Variables in your Admin Area.
- Click Search.
- Enter "analytics" in the Name field, then click Search again at the bottom of the page.
- In the field next to Google Analytics Tracking ID, enter your tracking ID. The ID should start with the letters "UA," followed by a series of numerals with hyphens. You can see the ID near the end of the analytics script you pasted in your template file.
- Click Save.
Alternative Analytics
Google Analytics’ standard tracking implementation allows you to view basic data about your store and customers such as page views, bounce rate, and referring sources; however, you can still go bigger. If you want more in-depth integration, you can set up ecommerce Tracking within your Google Analytics account and on your Volusion store.
Be aware that it might take some time before Google's system updates data obtained from your Volusion store, but after a few weeks, you'll be able to receive detailed reports and data about your store, visitors, and more.
Important Analytic Reports
Here are a few top used reports from each section in Google Analytics to help with analysis and decision making:
The Basics
• The search bar > top left: This is a great tool if you want to find something specific, but don’t remember where it lives in the vast left navigation. Simply type in what you’re looking for, and it will provide you with multiple options.
Audience
• Demographics > Overview: This section allows you to find more generalities about your customer base. You can see averages on visitors’ ages and genders to help you carve your marketing strategies to better align with who’s shopping on your site. How you market to women ages 25-34 and to women 65+ will be very different, so it’s important to have a better idea of who they are.
• Behavior > New vs Returning: The name says it all—in this report you can see who is a new customer and who is a returning customer. This helps show how many people are coming back to your site and who is brand new. It also gives more details into your different marketing strategies and whether or not they are working.
• Mobile > Overview: This section can be very helpful because you can see if your visitors are using desktop, mobile, and tablet devices, and to what percentage. This can help troubleshoot conversion issues by pinpointing a popular device and its conversion rate. Then you can isolate testing to find any issues on only that device. That way, troubleshooting is specific and efficient.
Acquisition
• Overview: This is a great dashboard of all your channels of marketing and how they are performing down the conversion funnel. You can see how the site acquired them, how they behaved while on the site, and those who converted.
• All Traffic > Channels: This is a bit more expanded version of the overview section mentioned above. However, above the graph on the left there is a link that says “Ecommerce.” If you click into that, you can see a nice breakdown of each channel of marketing and how they performed with ecommerce metrics.
• AdWords: If you are running a paid search campaign, you can link your AdWords account to your Google Analytics. That way, you can stay in one location to get a good amount of data from those efforts too. Of course, the most data will be right in AdWords, and you won’t be able to make any campaign adjustments from this view—it’s just a helpful way to pull information without toggling between two tabs.
• Social > Network Referrals: This section allows you to see which social network drove traffic to your site, how many pages they viewed, and how long they browsed for. This is great data because Social Media campaigns are so important for SEO purposes and to build an online community of loyal customers. By understanding which ones are engaging, you can shift your efforts to that network and be a part of the conversation.
Behavior
• Site content > Landing Pages: This report shows you what pages on your site visitors are landing on. This traffic can be from multiple options like direct links, bookmarked pages, and of course organic or paid results in the search engines. Be sure to note that /default.asp is your homepage too, so that’s typically a top contender. Use this data to find very popular pages that are deeper within your site.
• Site Search > Overview: In order to use this graph, you have to enable site search. Once it’s enabled, you can see what search queries visitors are looking for within your site’s search tool. This report can help you see popular products on your site, but it can also show you if the site isn’t intuitive and visitors are having to default to the search bar because they can’t find what they’re looking for.
Conversions
• Ecommerce > Overview: A great overview of how the site performed in sales. You can see the rate at which they converted, number of transactions, total revenue, and average purchase price for each order, and so on. This is a great dashboard of your site’s performance.
• Ecommerce > Product Performance: As a store owner, you most likely have a great understanding of what your customers have purchased and what your top sellers are. This report shows you an easily digestible breakdown of each product purchased.
• Multi-channel Funnels > Assisted Conversions: Think about when you purchase a product; more times than not, you shop around or come back to the site a few times before buying something. This report shows all of the channels of marketing and how they assisted in that final purchase. A visitor might find a site with an organic search result, but ultimately purchase through a PPC ad. This is important to understand because although the organic ad wouldn’t receive credit for this purchase, the purchase wouldn’t have happened without its assistance.
Make sure that you adjust the date range at the top right of the site to get a month, quarter, year or custom date range. Have fun with it too! You can’t break any of the data by clicking on reports or adjusting filters and/or views. By getting to know your data more, you can make educated decisions with site or marketing modifications.
Using A/B Tests to Boost Your Branding
The ultimate goal of ecommerce is to earn and grow sales. Higher conversion rates typically yield higher revenue and gross profit. The way to achieve higher conversion rates is by optimizing your website’s traffic. One way to optimize your site traffic is by running live, controlled experiments on your site visitors using two primary processes:
- A/B testing, also known as split testing, is when two versions of a page are tested against one another to determine optimal conversion rate. For most small- to medium-sized businesses, this is the way to go.
- Multivariate testing (essentially a more elaborate and often more informative A/B test) is where multiple variables within a page are changed and tested in different combinations to determine the impact of each variable on conversion rate and the optimal configuration.
These experiments allow you to test and measure the impact of anything and everything, from your email subject lines to the color of your “buy now” buttons to the price of your products. The tests help you discover exactly which words, colors, prices, and other variables you are testing compel consumers to open, click, and buy more often. Once you know which versions convert best between two (or more) groups of site visitors, you can apply them to all of your visitors.
A/B testing has been around for decades. But thanks to sophisticated, low-cost online tools, it is easier and more affordable than ever before. Today every online merchant can—and should—conduct A/B tests to boost his or her conversion rates. After all, what online merchant doesn’t want to make changes that are proven to boost sales?
Here’s an overview of the art and science of A/B testing and conversion rate optimization so that you can begin reaping all of the rewards of this ecommerce business power tool.
Steps of A/B Testing
Conversion rate optimization may seem complicated at first, but it’s really not hard to get started—and testing platforms manage the logistics (the division of the site traffic and all the math). There are four steps:
- Step 1: Develop your test case. What changes to your site do you believe will convert more visitors into customers? Frame it as a hypothesis. Try to empathize with your visitors and understand what their questions, tasks, and frustrations might be. Remember, your visitors don’t always (or maybe ever) think like you. Don’t forget to document this stuff, along with the results of your tests. It will prove valuable down the road.
- Step 2: Divide your site traffic into two or more groups, and give each group a different experience of the same variable—such as the wording of a subject line or the placement of a “buy” button. This is the technical part, but your testing software typically facilitates this work.
- Step 3: Measure how well each group converts. The conversion rate is simply the percent of visitors who purchase divided by the number of visitors in the group. Testing software typically applies statistical methods to determine just how meaningful the conversion rate differences are.
- Step 4: If you’ve got a winner, update your site to reflect the improved experience and enjoy the added dollars your site will make as a result.
When conducting A/B testing, there is a risk of random chance influencing the outcome. However, today’s most popular testing tools do all of the heavy lifting for you and boil the results down to simple decision-making criteria. The output is typically a percentage that more or less represents how solid the findings are: 90% or more is pretty solid, while less than 90% is not.
A range of conversion rates is known as the “confidence interval.” This represents the range in conversion rates that you might observe long-term or in repeated sampling of your site visitors. It indicates that 95 out of 100 similar samples will fall within this range.
Conduct an A/B Test on Your Volusion Site in Just Three Clicks
Because Volusion appreciates the power of A/B testing to impact conversion rate optimization, we’ve integrated it into your store and made it extremely easy and fast to conduct A/B tests. In fact, you can conduct a test in just three steps. You do need to look at the code fueling your site—but only briefly, so don’t let that stop you.
Before you begin, go to Optimizely.com and open a free account. Optimizely will provide you with a short snippet of code that will look something like this:
<script src=”//cdn.optimizely.com/js/1234858585.js”></script>
Simply copy this snippet into your clipboard and go to your Volusion store admin console.
- Step 1: From the templates page of your admin console, click “Edit html.”
- Step 2: Within the box showing your template code, near the top, locate the line that reads <head>. Add a line after it, then paste in Opitimizely’s code snippet.
- Step 3: Hit the “Save” button.
Now you’re ready to set up tests within the Optimizely interface.
What is Optimizely?
Optimizely made waves in the online marketing world when it launched ecommerce testing tools that make online experimentation easier, faster, and more affordable—thereby making testing a viable tool for online businesses of all sizes.
The lynchpin of Optimizely’s testing platform is its amazingly easy-to-use WYSIWYG (which stands for, “what you see is what you get”) GUI (“general user interface”). You can simply drag-and-drop your site elements into the platform. This means that swapping out colors, text, images, and more in your A/B tests is a snap.
For merchants who treat the tech side of their businesses as a need-to-know-only endeavor, Optimizely generates the code for you when you run your tests. You just cut and paste it in your site. For the more tech-savvy merchants among us who love nothing more than playing around with web code, Optimizely allows you to go under the hood to edit the code in numerous ways, so you can conduct advanced experimentation.
The great thing about A/B testing with tools like Optimizely is that even people who haven’t built their entire careers around the science of online testing can accrue the benefits. Once you’ve run a few experiments and gained the rewards, don’t be afraid to take your new-found testing skills to the next level with advanced website development expertise, sophisticated site design capabilities, and higher math know-how. These skills sets will make you an even better conversion rate optimizer.
Set Up Social Media Metrics
It can be a bit overwhelming to review social media marketing metrics and decipher what is important and what isn’t. While Facebook likes and Instagram followers are nice, large followings are easy to obtain via slimy tactics such as buying fake followers. If there is one thing we suggest to merchants who are new to social media and are trying to make the most of their efforts, it's never buy followers. People are generally wary of Instagram accounts with 45k followers and only a handful of posts. Unless your brand has recently been on Shark Tank or you have a famous spokesman, instant success with numbers like these is highly unlikely.
So which social media reporting metrics should you focus on? Let’s cover six that are key to measuring your success with Facebook and Instagram advertising, accessible through Google Analytics and Facebook Ads Manager.
Google Analytics Social Media Metrics for Ecommerce
Network Referrals are an essential social media metric for an ecommerce company. This will show you which social networks are sending the most traffic to your website and where you should be focusing your efforts. While it’s important to have a presence on the big social networks (Facebook, Instagram, Pinterest, and Twitter) it is not mandatory to post on all of these networks regularly. We recommend picking 2-3 networks on which your audience is most active and engaging on and sticking to those.
Network referrals can be helpful in finding new networks to be active on. For instance, if Reddit is sending a large amount of referral traffic to your site, you should investigate why this is happening and see if there is a way to capitalize from it. Reddit is becoming a marketer’s diamond in the rough, as the network is often overlooked by brands; however, when done correctly, it can provide a boost to your bottom line as well as traffic to your site.
Social Conversions may be the most crucial metric for your finance department, as they help to justify the amount of time that you invest in social marketing. Google Analytics will show you how much money and how many conversions each network has contributed to. Often you’ll see that audiences from different networks will interact with your website differently. Facebook may be sending more traffic to your website, and those who are purchasing may be making smaller purchases than those who are visiting from Instagram.
Facebook Advertising Metrics for Ecommerce
If you are investing your marketing dollars into Facebook and Instagram ads—and nowadays this is practically a necessity—you’ll want to keep an eye on several of the reporting metrics that are offered in Facebook Ads Manager.
Amount Spent will help you make sure that you are staying within your allotted budget. When you have multiple campaigns running, you’ll want to see how well each campaign is performing and if budgets should be adjusted. Sometimes the campaign that you think will be your breadwinner ends up performing poorly. In those instances, you can choose to stop running the campaign or to lower the budget and move your campaign dollars to more successful campaigns.
Button Clicks are more important than the Cost per Result metric when you are running Website Click campaigns. This is the amount of people who clicked on your “Call to Action” button. The number will be lower than the Results number, and should be compared to your Network Referrals in Google Analytics. 99% of the time the numbers will not match up, but that’s okay. To truly see how many people are visiting your website from your Facebook ads, we suggest setting up ROI tracking on the backend of your Volusion store. To do so, set up a unique click ID found under the ROI tracking tab in your Volusion admin. Doing so will show you how many site visits you’ve received with this click ID, as well as how many sales it has contributed to as well as which sales resulted from these ads.
Frequency is important because you don’t want to give your audience ad fatigue. Do you ever see the same ad day after day in your newsfeed and get annoyed that you keep seeing it? That’s how your audience feels when they see your same ad multiple times a day for several days at a time. To prevent this from happening, set a frequency cap on your campaigns. I recommend a frequency cap of 3 impressions per week as a maximum.
Relevance Score will show you how well your current ads are performing. A relevance score of seven or above means you’re doing great; a score below that means you need to make some changes to your ad(s). It could be that the targeting is incorrect, your audience is seeing the ad too frequently, or the text and photo need to be revised.
Facebook Ads Manager will provide you with an overwhelming amount of data that may be hard to interpret unless you’re a full-time social media advertiser. Focus your efforts on reviewing the above-mentioned metrics and compare the data monthly to see if your efforts are paying off.
Build the brand you’ve been dreaming ofIf you made it all the way through this guide, you know more about branding than 99% of ecommerce merchants, which will give you a huge leg up on the competition. Now it’s time to put this knowledge into practice. Any professional online merchant will tell you that getting your branding right is one of the most important parts of setting up an online business, and will make or break most online stores. Follow the steps in this guide and you’ll have a unique branding plan for your business that will help you build a loyal customer base. If you’re ready to get started, try a risk-free 14-day trial of Volusion’s award-winning ecommerce platform. From creating a beautiful storefront to managing inventory and accepting payments, Volusion is the easiest way for entrepreneurs to build the business they’ve been dreaming of.
 from Volusion Ecommerce Blog | SMB Marketing, Design, & Strategy https://ift.tt/3amjSXg via IFTTT


No comments:
Post a Comment